What is a Frozen Shoulder?
So what is a “frozen shoulder”? The medical term for frozen shoulder is adhesive capsulitis. This is where the connective tissue around the shoulder (the “joint capsule” and ligaments) becomes stiff and inflamed. This stiffness can often cause pain and significantly restricted mobility.
Causes of Frozen Shoulder
Frozen shoulder may develop as a result of an injury, a complication of diabetes, an adverse reaction to prolonged use of a sling after surgery, or an unfortunate side-effect of a stroke/Parkinson’s/etc. For some people frozen shoulder can oftentimes be debilitating. Likely, your doctor will recommend physical therapy, a corticosteroid injection, joint manipulation, or in some cases surgery to restore your shoulder’s range of motion and alleviate the pain.
Frozen Shoulder Exercises
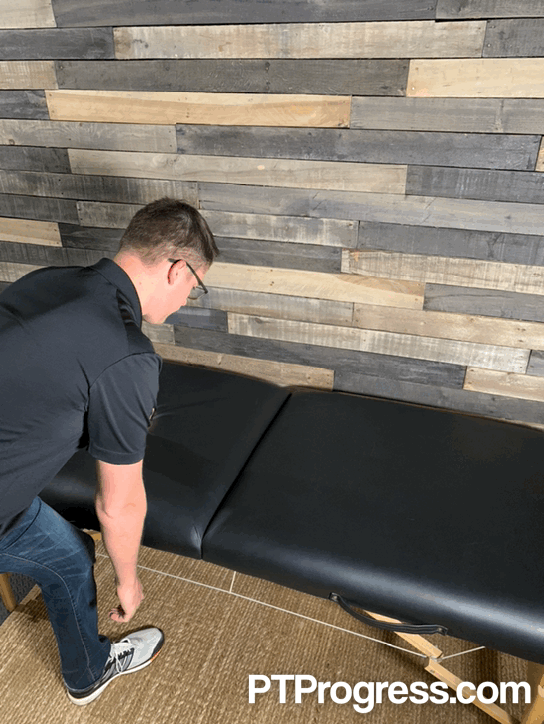
1. Pendulums
This is an easy exercise to do, but also easy to do incorrectly! Here’s how to perform the pendulum frozen shoulder exercise.
- Lean forward by placing your hand or elbow on a table, counter, or back of a chair
- Allow your affected shoulder to hang totally relaxed down toward the floor
- Take a wide stance and shift your weight from one foot to the other, allowing your momentum swing your arm as opposed to using your shoulder muscles
The arc of motion should be relatively small and holding a light weight such as a dumbbell or can of soup. Perform 1-2 minutes of rhythmic swings forward/backward, side-to-side, and in clockwise/counter-clockwise circles.
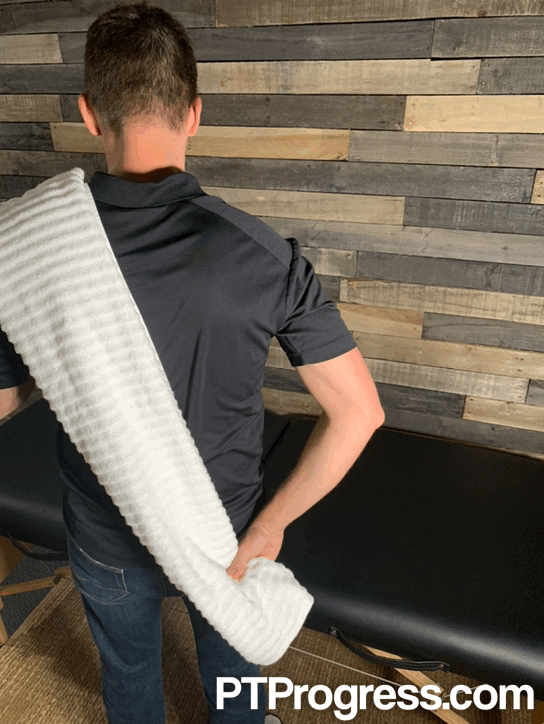
2. Towel Stretch
This will likely be the most challenging stretch for someone with a frozen shoulder.
- Use a large towel (or dog leash) to help reach your affected arm behind your back
- Grab one corner of the towel in your affected hand on the back side of your hip
- Grab the other end of the towel with your unaffected hand with the towel coming up behind your back and draped over your unaffected shoulder
- Use your unaffected arm to pull upwards or forwards to assist your affected arm in stretching up/behind your back
- Hold for 10-30 seconds for 5-10 repetitions
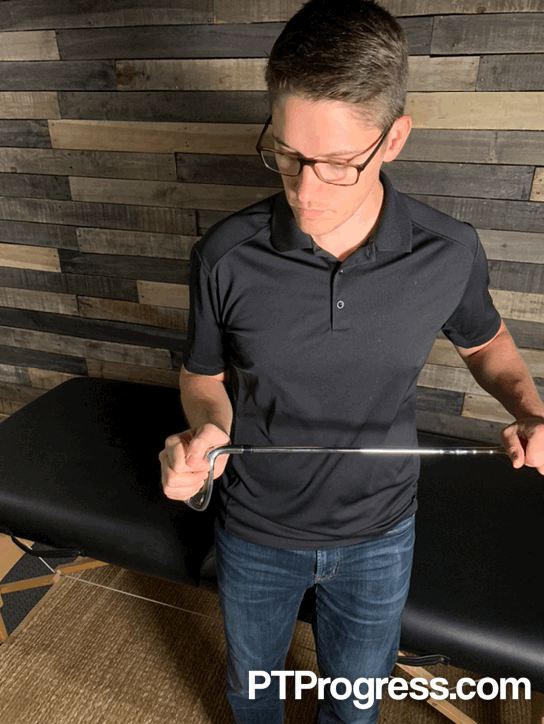
3. External Rotation Stretch
For this exercise you have 2 options: use a golf club/stick or use a doorway/corner.
Golf Club/Stick
While standing, hold a golf club or other stick in your unaffected arm, and place the hand of your affected arm on the opposite end. Keep your affected elbow close to your body and bent to 90 degrees. Push with your unaffected arm toward your affected arm to rotate your affected shoulder outward.
Doorway/Corner
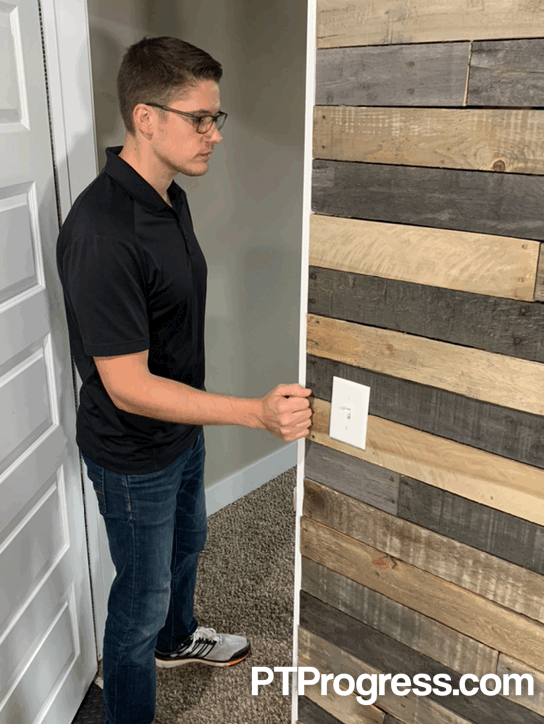
While standing, bend your affected elbow to 90 degrees and place your affected hand on a door frame or the corner or a wall in front of you. Keep your affected elbow close to your body. Rotate your body away from your affected arm (ie. If your right shoulder hurts, place your right hand on the wall and rotate left) until a stretch is felt or you reach the point of increased discomfort.
For either stretch, hold 10-30 seconds for 5-10 repetitions
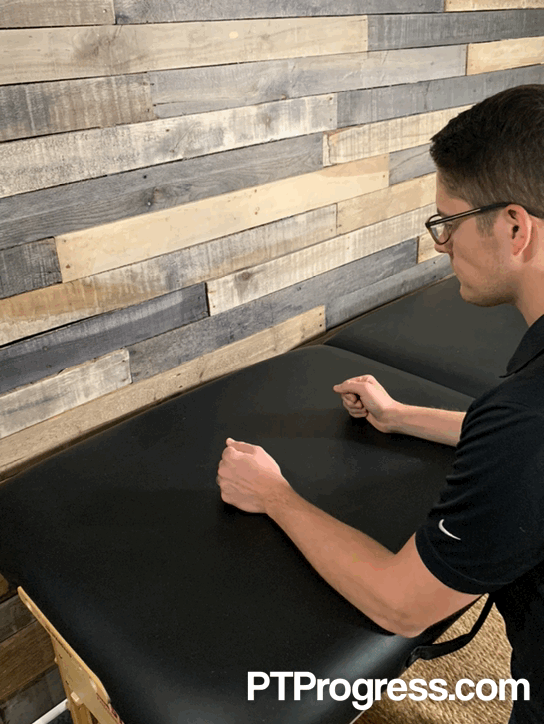
4. Forward Reach/Slide
Again, you have 2 options for this exercise: you can use a swiss ball or a table to perform these frozen shoulder exercises.
Swiss Ball
If you have a swiss/yoga ball, place both hands on the ball while you’re seated in a chair. Lean your body forward, allowing your arms to roll the ball until you feel a stretch or discomfort in your shoulder.
Table
Sit in a chair at the kitchen table and rest your affected arm on the table (you may use a towel between your arm and the table to help it slide)
Relax your arm and lean your chest forward, allowing your body to cause your arm to slide forward on the table until a stretch or discomfort is felt
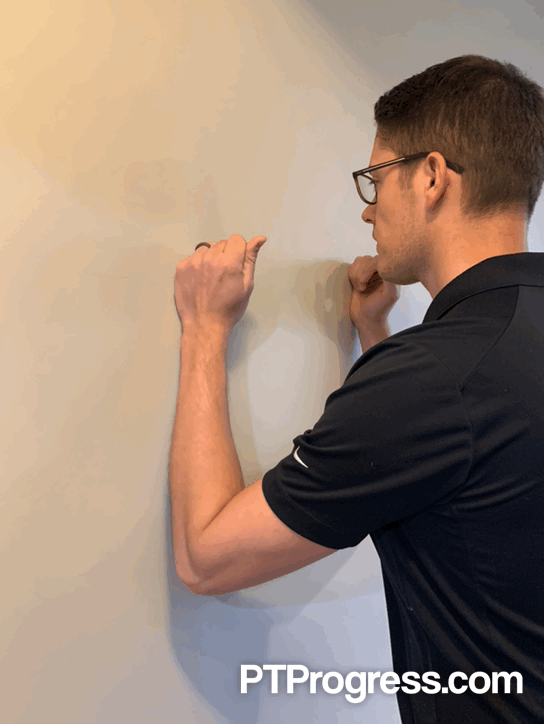
*You may also do this standing while sliding your arm up a wall, an exercise known as the wall slide. Performing this motion in the shower with warm water may help. For either stretch, hold 10 seconds for 10-20 repetitions
5. Overhead Pulley Stretch
This is perhaps the best way to improve ROM with a frozen shoulder. However it is also the only stretch on this list that requires additional equipment. This pulley is less than $15 and should do the job!
- Attach the pulley system above above your door, close the door, and place a chair up against the door
- While sitting, use your unaffected arm to pull downward on the pulleys, raising your affected arm overhead. Be sure to keep your affected arm completely relaxed.Begin by allowing the pulleys to stretch your arm forward; then progress toward stretching your arm at a 45 degree angle out to the side, and eventually directly sideways
Try to perform the pulleys consecutively for 2-4 minutes, pausing for 2-3 seconds at the top each time for a stretch
Should I Use Ice on a Frozen Shoulder?
You can also use an ice pack for 10-15 minutes following performance of these exercises to help alleviate pain. Once in the Thawing Stage, if you have limited mobility but minimal pain, you may find that using heat helps to loosen the shoulder before performing these stretches. Staying in a tolerable range of motion is important, because taking a “no pain, no gain” approach and being overly aggressive can result in increased inflammation and pain. As always, consult with your physician or physical therapy before performing these exercises.
Frozen Shoulder Stages
But what can you do on your own to get started treating frozen shoulder? Well, first it is important to note that a frozen shoulder is identified to be in one of three stages. They are unimaginatively called: The Freezing Stage, The Frozen Stage, and The Thawing Stage.
The Freezing Stage is when most people seek medical attention. Over the course of 6 weeks to several months, the range of motion in your shoulder gradually becomes more and more limited and the shoulder is typically quite painful.
The Frozen Stage thankfully is far less painful, but this is a period of up to 6 months where the immobility of your shoulder has reached its peak.
The Thawing Stage is where function and mobility of your shoulder is restored over the course of 6 months to 2 years. Here’s where your jaw should fall open and your eyes widen as you scream in your head (or perhaps out loud) “two years!?” Unfortunately yes, in some cases. What is interesting though is that in studies comparing those who were treated surgically and those who were treated with physical therapy, they found that the results in both groups were roughly the same at that 2 year mark.
Ultimately, despite its prevalence, and due in no part to lack of research, we still don’t fully understand adhesive capsulitis. While the evidence of the degree to which physical therapy is an effective treatment is mixed, it is generally accepted that the proper stretches/exercises can speed recovery and help minimize pain.
That brings us back to our most important question: What exercises can I do to treat my frozen shoulder? Below are some of the best exercises and stretches you can do on your own at home, with little or no equipment.

This article was written by Dan Murphy DPT, OCS. Dan graduated from Washington University in St. Louis in 2016 and lives just outside of Chicago with his wife and 2 year old son; though he and his wife are expecting a daughter in a few months! He enjoys playing board games and any outdoor activities with friends and family.
References:
https://publishing.rcseng.ac.uk/doi/full/10.1308/147870811X582080