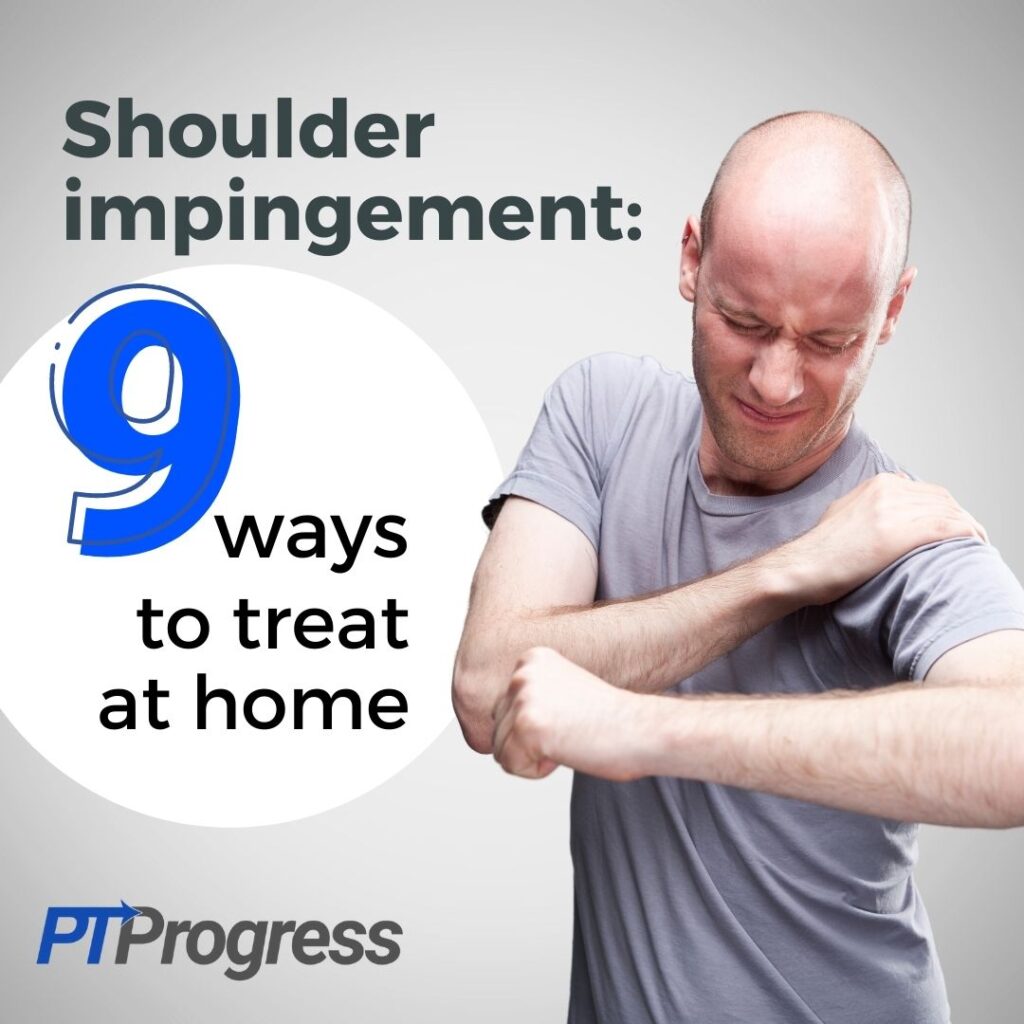
With a shoulder impingement, simple movements such as putting on a coat or reaching into a cabinet can cause extreme pain in your shoulder. As a Physical Therapist, I can attest that pain and loss of mobility will only get worse if you leave it unaddressed, especially if you are a manual laborer or your job requires overhead arm movements.
In this article I’ll share 9 exercises and stretches you can do to combat shoulder impingement, after I’ve explained a bit more what it is.
Shoulder Impingement Syndrome Explained
Think of shoulder impingement syndrome as a kind of tendinitis in your rotator cuff muscles. At least, that’s what makes it painful. But the reason for the inflammation bears a bit more explanation.
To “impinge,” in medical terms, means to pinch or encroach on something else, such as when a bone presses on a muscle or nerve. In the case of shoulder impingement, the shoulder blade rolls forward and rubs the muscles of the rotator cuff, causing irritation, inflammation, and eventually pain. Repeated stress to those muscles, rotator cuff tendons, or bursa (little fluid-filled sac in the shoulder) may even lead to a rotator cuff tear – but that’s something we’ll cover in a different article.
Another way to think of it is a narrowing of the subacromial space between the humerus (your upper arm bone) and the acromion of the scapula. Oftentimes, this narrowing is a result of poor posture, such as rounding one’s shoulders when sitting or standing. Rounding brings your shoulders forward and internally rotates the humerus, decreasing the space in your shoulder joint. Consequently, your thumbs will point inward whenever you stand with your arms by your side—a telltale sign of impingement.
While shoulder impingement syndrome diagnosis is not consistent across providers, according to this systematic review, there are a few key contributors to impingement that I’ve seen as a Physical Therapist.
Causes of Shoulder Impingement: Muscle Imbalances, Poor Mobility, and Poor Posture
Based on the evidence I see every day in the clinic, there are three underlying reasons why a patient develops shoulder impingement:
- Mobility issues
- Weak rotator cuff muscles
- Poor coordination with specific movements
Most people have poor posture to one degree or the other, and this causes mobility issues. But if you also have weak muscles in your rotator cuff, you may be even more likely to develop an impingement. The rotator cuff is a key contributor to shoulder impingement because it helps situate the head of the humerus in the shoulder socket. If these muscles are weak, then other, stronger muscles such as the deltoid atop your shoulder will compensate, leading to poor mechanics and increased impingement.
This imbalance of the shoulder muscles further impairs your coordination—the mechanics of movement. Continue the vicious cycle, and that painful response you’re experiencing will only cause more inflammation and stiffness in your shoulder.
Top 3 Shoulder Impingement Symptoms
- Pain with Overhead Arm Movements
- Pain and tenderness in the front of your shoulder
- Weakness of the rotator cuff muscles
So how do you break the cycle of poor posture, inflammation, and pain? With a one-two PT punch of proper stretching and consistent exercise!
9 Exercises for Shoulder Impingement
A bad case of shoulder impingement could land you in the physical therapy clinic, but truth be told, there are many things we do in the clinic that you can try at home. (…and at your own risk. Always consult a doctor first and stop the following exercises if your pain increases!)
Disclaimers aside, let’s jump into these conservative treatment ideas for shoulder impingement.
#1. Pendulum
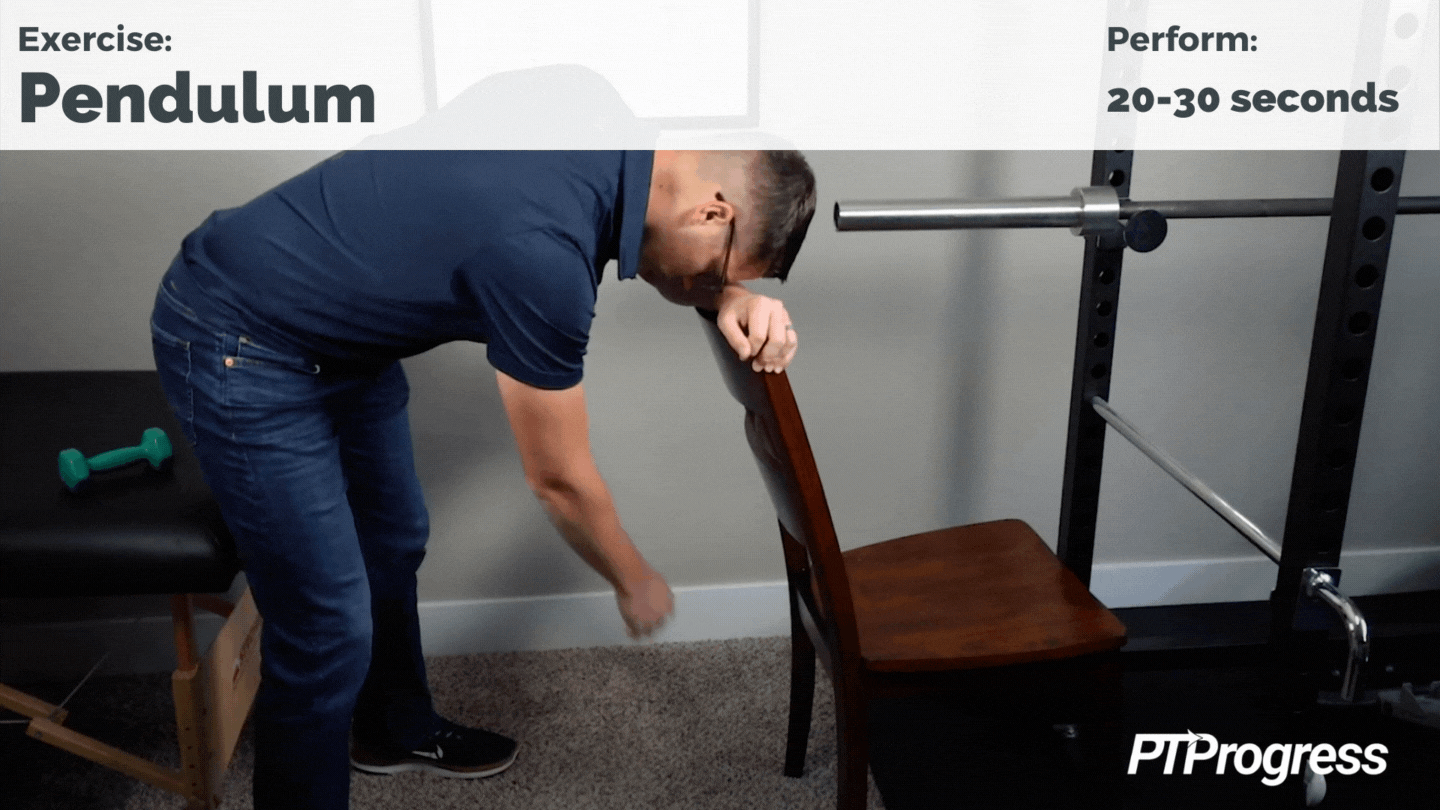
This first exercise, called a pendulum or “arm hang,” is remarkably easy. Stand bent forward so that your arm hangs in front of you. Relax so that the full weight of your arm can better “distract” (open up the joint space in) your shoulder.
From here, simply swing your arm like a pendulum or in a circular motion. You can further distract the joint by holding onto a water bottle as you perform the exercise.
Hang out like this for 30–60 seconds.
As you swing your arm, you should feel immediate relief of some pain. That’s what makes the pendulum a great exercise to begin with and one you can return to throughout the day whenever your shoulder hurts.
#2. Doorway Stretch
These next three exercises are actually a series of stretches PTs use to address mobility issues in the shoulder caused by poor posture.

The doorway stretch is a must, especially If you round your shoulders when standing.
Stand in a doorway and place your elbow overhead on the frame, so that it’s higher than your shoulder. From here, slowly turn your upper body away from the door frame until you feel a nice stretch from your chest to your shoulder.
Hold this stretch for 20–30 seconds, 2–3 times a day.
For posture’s sake, be sure to repeat this on the other side with your other arm, even if you don’t have pain in that shoulder.
#3. Foam Roller Supine Stretch
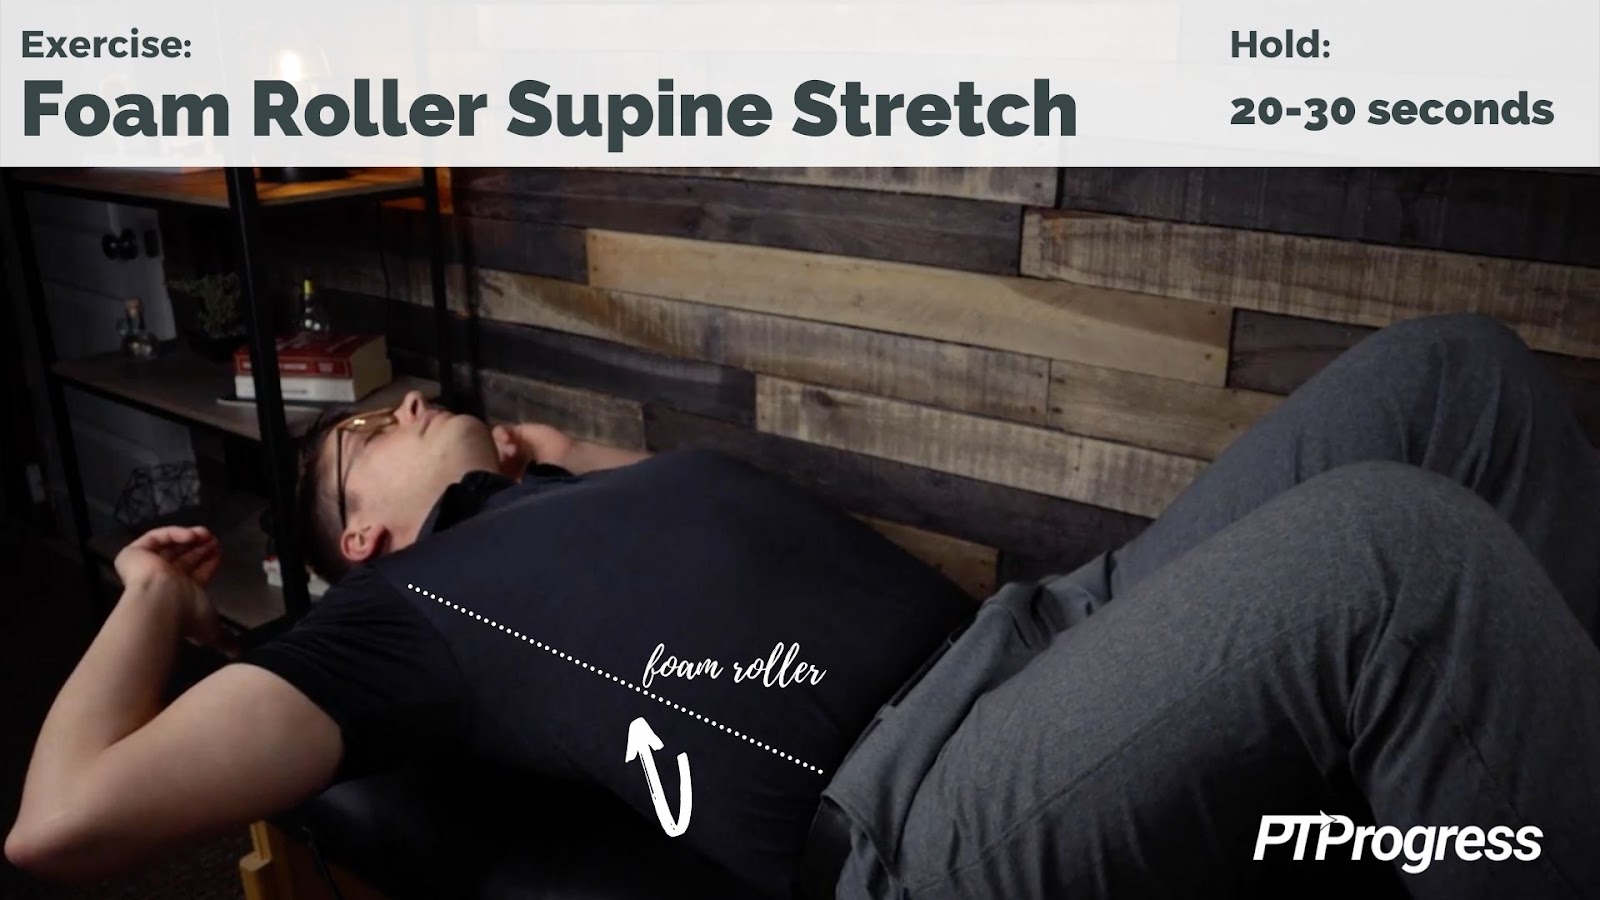
Another way to target the pectoral muscles and open up the chest is by stretching on a foam roller. If you don’t have a foam roller, use a rolled up towel.
Lie down on the foam roller or towel so that it’s along the length of your spine. Open your arms into a T or goal-post shape and let gravity pull on your arms to stretch your pecs.
Hold this stretch for 30 seconds, repeating 2–3 times a day.
#4. Countertop Thoracic Extension

This movement is useful in two ways: it helps stretch the latissimus (lower back muscles) and extends the thoracic spine. You use the latissimus muscle whenever you rotate your arm internally or inwardly, so it’s important to counter that motion with a mobility drill like this one.
Place both elbows on a counter and step back so that your head is between your elbows, at the level of the countertop. From here, keeping elbows and head over the counter, shift your weight and rock back on your heels until you feel a stretch in your lower back.
Hold this for 20–30 seconds 2–3 times a day.
With a regular routine of these three stretches (#2–4), you can improve your thoracic mobility and promote better posture—crucial for combating the pain of shoulder impingement.
#5. Wall Slides
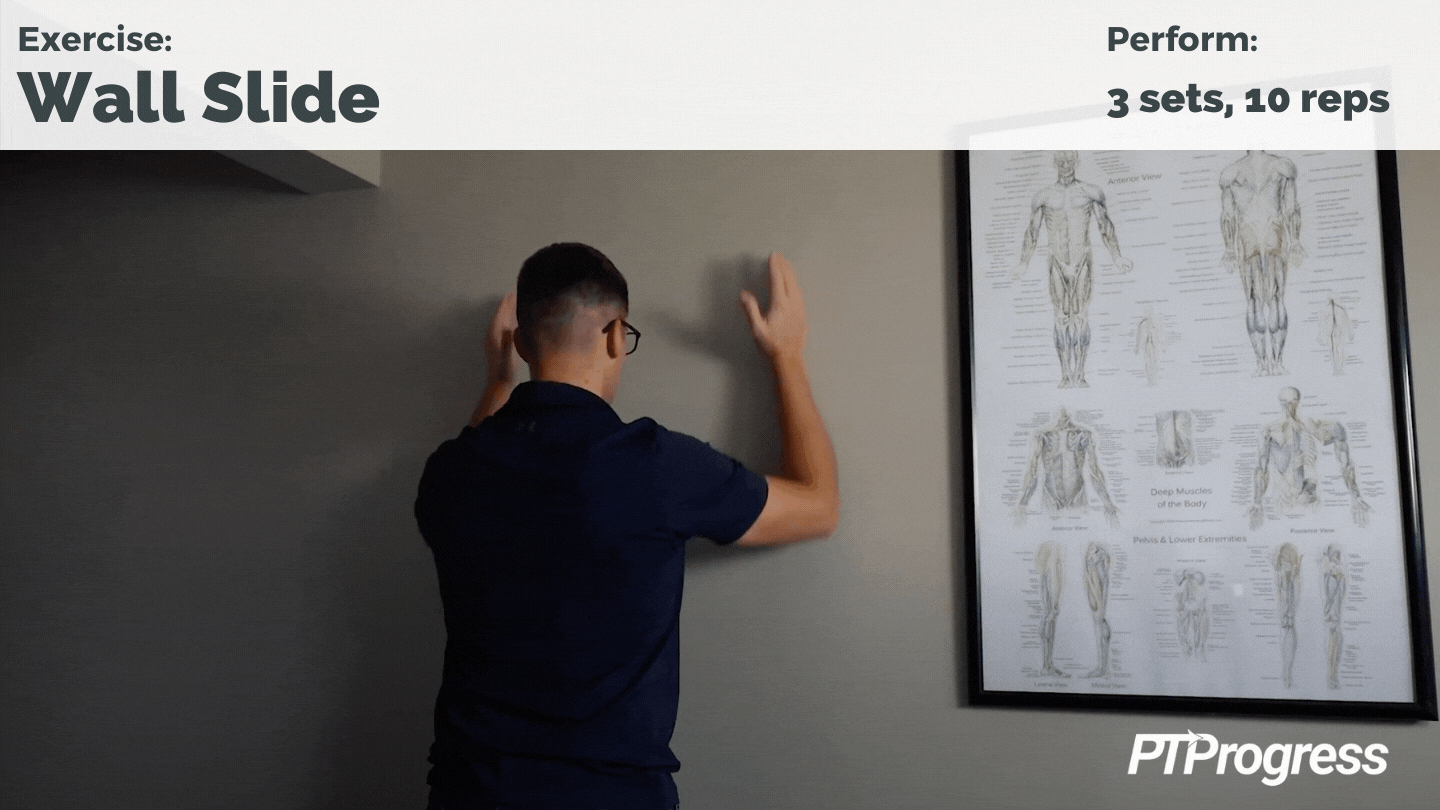
For this exercise, all you need is a blank wall and a towel. Stand close to the wall and place your hands on the wall in front of you, just below shoulder height. From here, slide your hands up the wall as far as you can go without any pain (very important!). Once you arrive at the top of your range, slowly lower your arm, using the wall to support your arm weight as it slides down.
The beauty of wall slides is that the wall supports your arm weight and lightens the load for your shoulder. I love showing this exercise to a patient with shoulder impingement, because they are usually pleasantly surprised by how much more easily they can reach overhead.
I recommend using a towel as a buffer between your hands and the wall to reduce friction. To create even more space in your shoulder joint, try slightly rotating your body away from the wall as you raise your arm (similar to the doorway stretch), or slide your arm up at an angle.
Start with 3 sets of 10 wall slides each day.
Practice this movement daily and, with a bit of consistency, you’ll eventually see yourself reach further and further up the wall.
#6. Countertop Plank with Press-Up
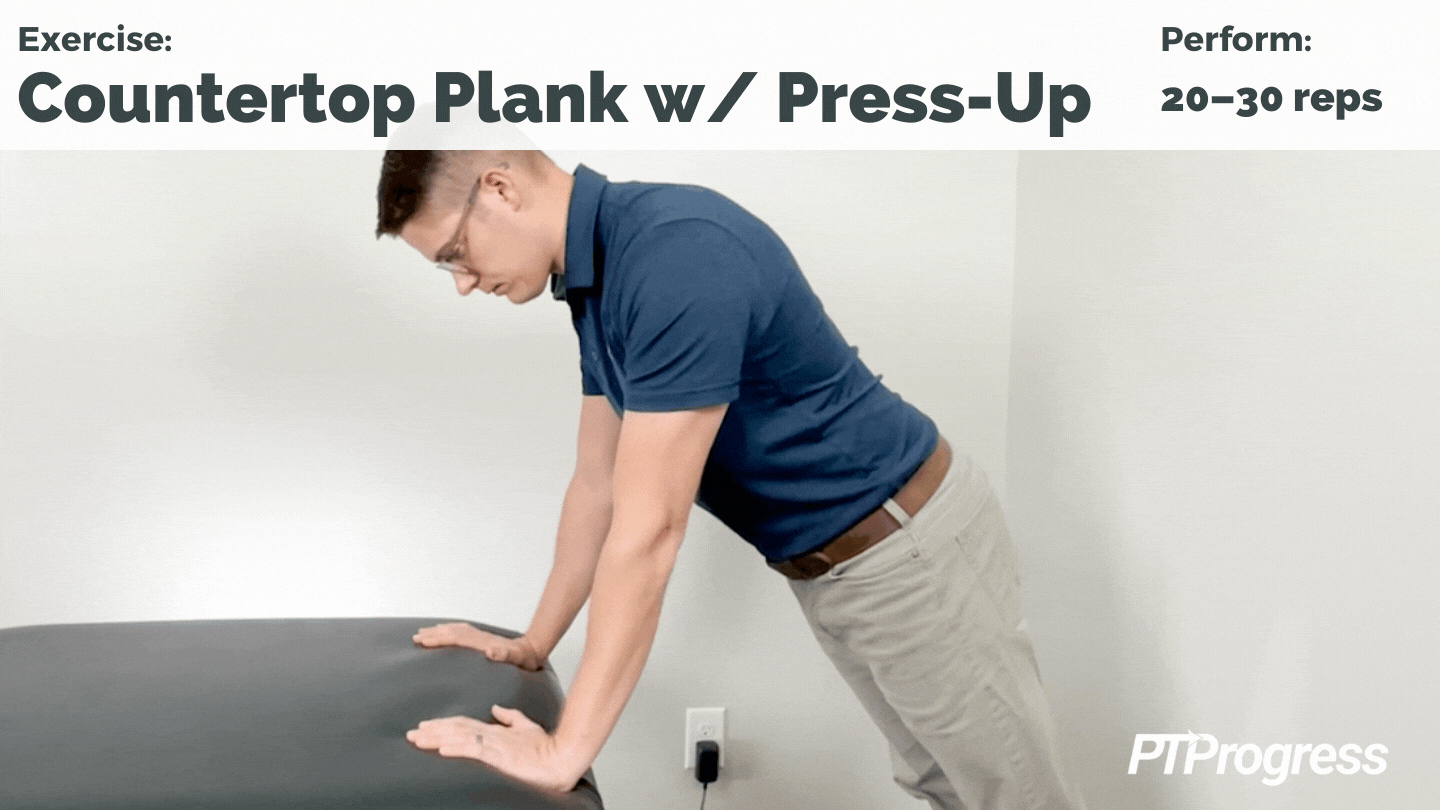
This next exercise targets the serratus anterior, a small-but-mighty muscle that lives deep under your pectoral muscles. The serratus helps you reach into flexion and upwardly rotate your scapula. Without it, you’ll have a hard time properly reaching overhead, and like I said before, poor coordination often leads to further impingement.
Go back to your countertop and stand over it with your arms extended, as if you’re going to do a push-up. Instead, round your upper back slightly as you push away from the countertop, without picking up your hands. The movement should be very small. Relax to return to your starting position with arms extended to complete one rep.
Make it your goal to perform this movement pain-free 20–30 times a day.
#7. Supine Serratus Punch
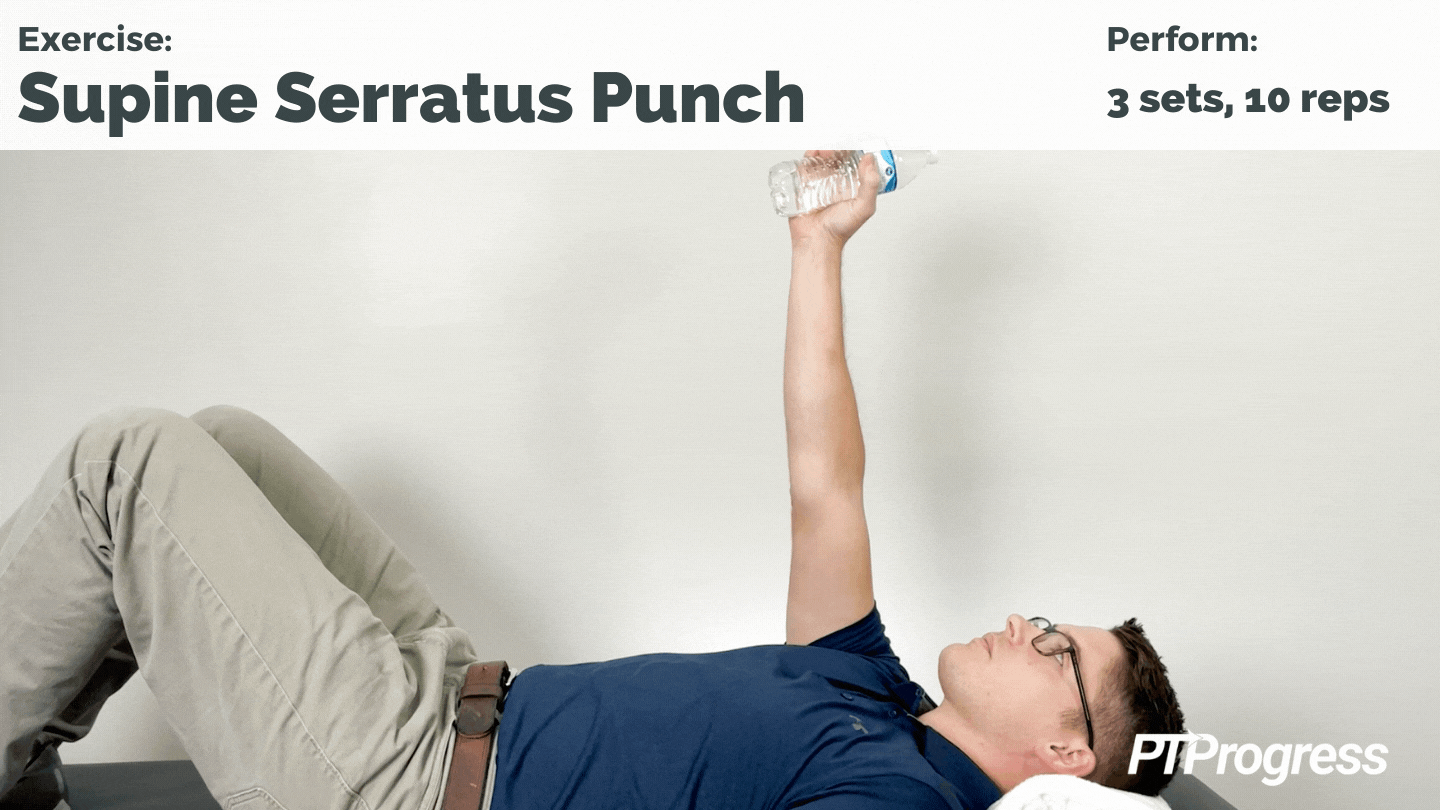
Don’t underestimate the importance of a strong serratus! Another way you can target it is with a serratus punch.
Lie on your back (in a supine position) and raise your arm to 90 degrees. Next, extend your arm towards the ceiling in a small punching motion.
This isn’t a big movement either, but it’s great for activating the serratus muscle. You can progress the exercise by gradually adding resistance, such as a 1- or 2-pound weight or even a water bottle.
Start without using weight, however, and shoot for 3 sets of 10 repetitions for your routine.
Now it’s time to focus on strengthening the rotator cuff, a key contributor to your impingement and a critical factor in your recovery.
#8. Scapular Retraction or Shoulder Squeezes
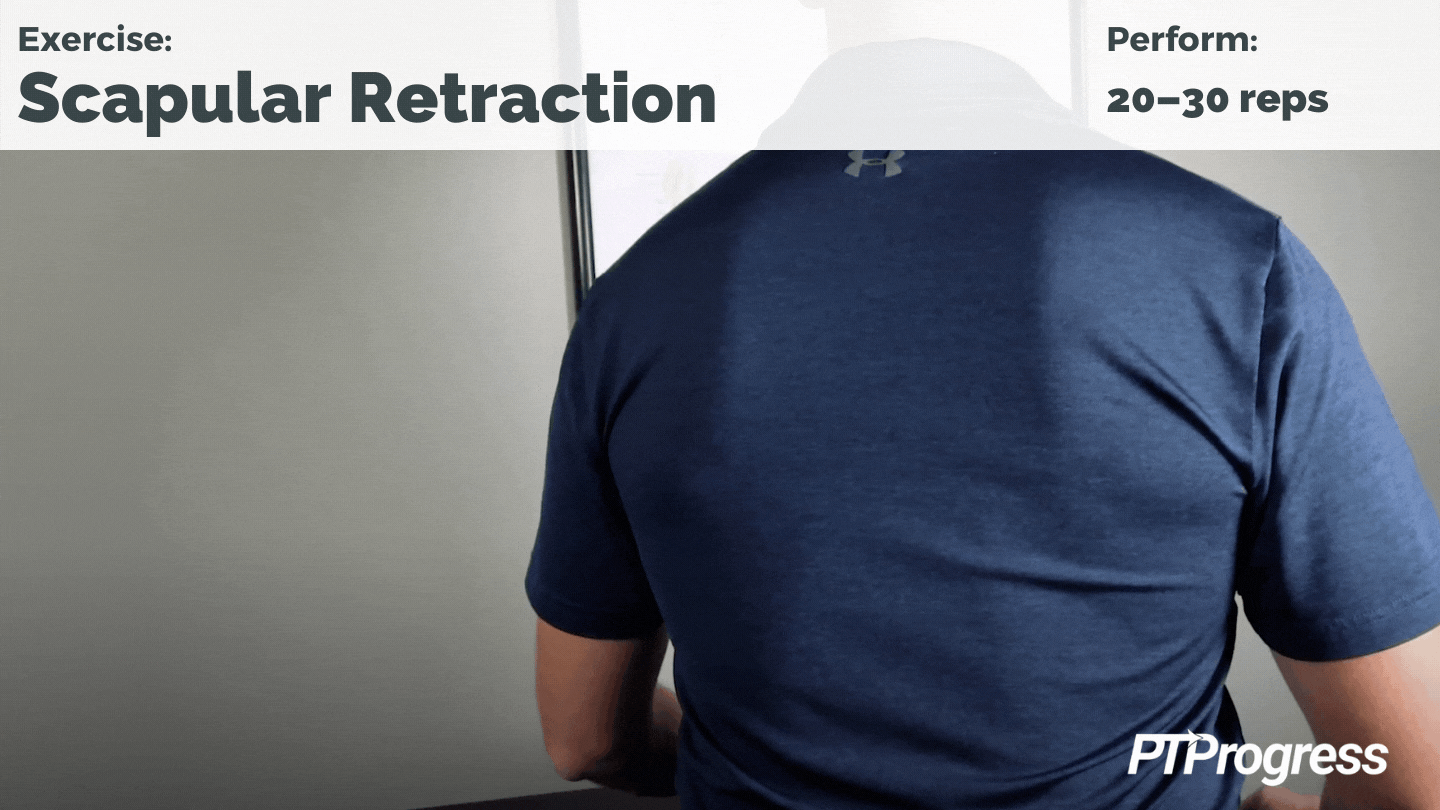
The first exercise to master is a simple shoulder squeeze exercise, or scapular retraction. I personally find this movement really helpful in relieving mid-back and neck pain, in addition to shoulder impingement.
All you have to do is squeeze your shoulder blades together on your back. Think “down and back”—don’t shrug your shoulders upwards. Shrugging activates the upper trapezius, which is not the muscle to strengthen right now.
You can perform shoulder squeezes sitting or standing, so it’s easy to fit these into your day while at your desk or waiting on line.
Aim for 20–30 shoulder squeezes multiple times a day.
#9. External Rotation: Two Ways
Once you’ve mastered scapular retraction, focus on strengthening the external rotators of your shoulder. There are two ways to perform this exercise.

Standing:
Tuck a rolled-up towel under your arm between your elbow and your body. The towel ensures you’ll maintain proper form, with your elbow hugging your body throughout the movement.
Next, rotate your arm outward, within your pain-free range and without a resistance band to start. If this movement is too painful even without any resistance, scoot up to a wall and press the back of your hand into another towel on the wall. Imagine you’re doing the same external rotation, with the wall preventing you from going beyond your range. We call this an isometric exercise; it helps you engage the external rotator without increased pain.
- DESIGNED BY PHYSICAL THERAPISTS FOR MAX DURABILITY – Unlike generic bands, the Bob and Brad resistance bands set is redesigned with reinforced nylon...
- YOUR PORTABLE HOME GYM EXPERIENCE – Skip the crowded gym. This all-in-one exercise bands kit includes 5 color-coded tube bands, 2 cushioned non-slip...

As your pain improves and your range opens up, challenge yourself by adding a resistance band. The setup is the same as the first way, except you’ll hold the end of a resistance band in your hand and stretch it out and away from you as you externally rotate your arm.
Try to perform 3 sets of 10 repetitions of external rotation. If you’re starting with the isometric version, hold for 10 seconds.
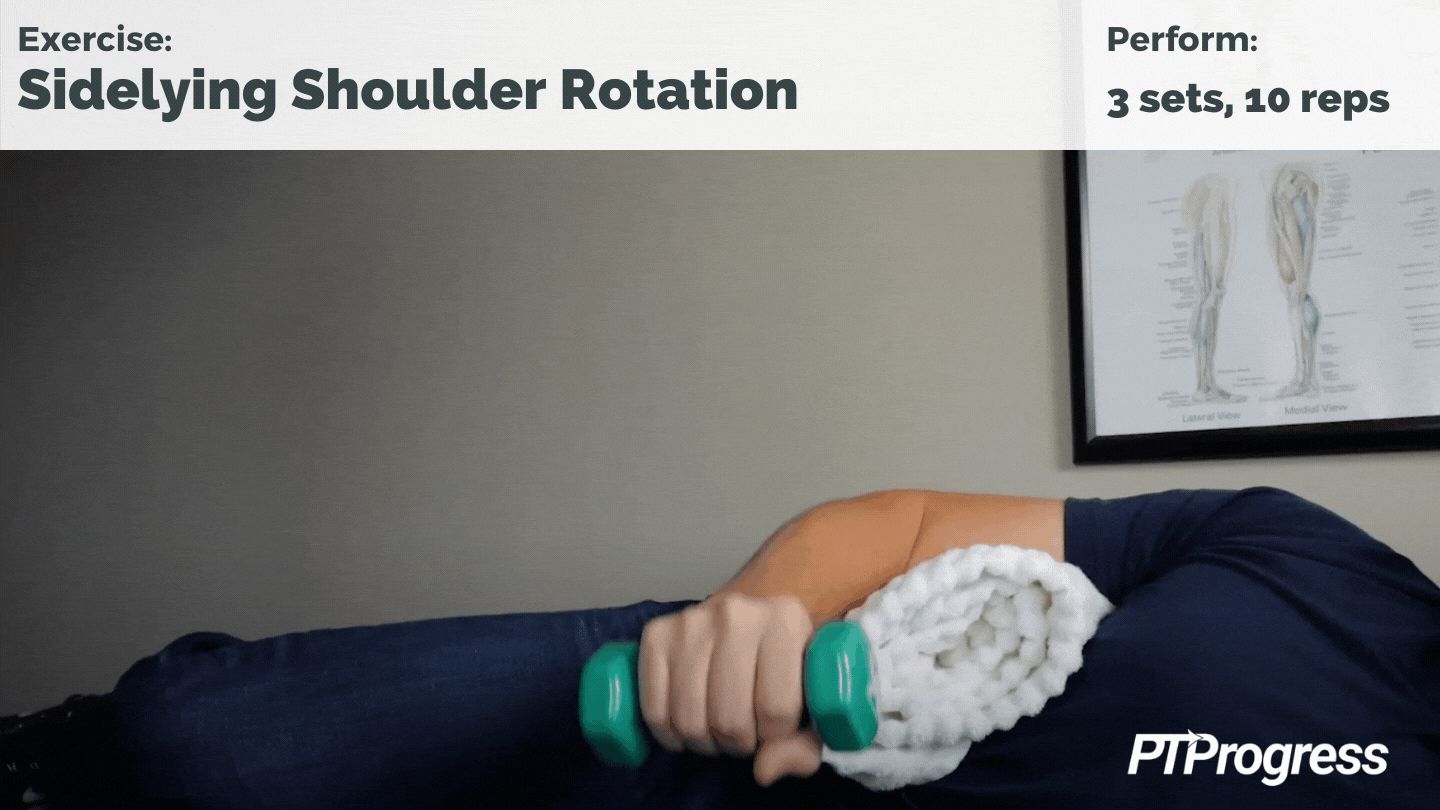
Side-lying:
You can challenge this muscle group another way with a round of side-lying external rotation. With the towel tucked under your arm again, rotate your arm upwards towards the ceiling and return inward to complete one rep. Think about spinning your arm smoothly within the shoulder joint, which should be free of painful clicking and popping.
You should start without any weight, but when you’re ready to gradually increase resistance, hold a 1- or 2-pound weight as you rotate.
Perform 3 sets of 10–15 repetitions of this exercise as a part of your routine.
Bonus Exercise: Stick Diagonals for Range of Motion
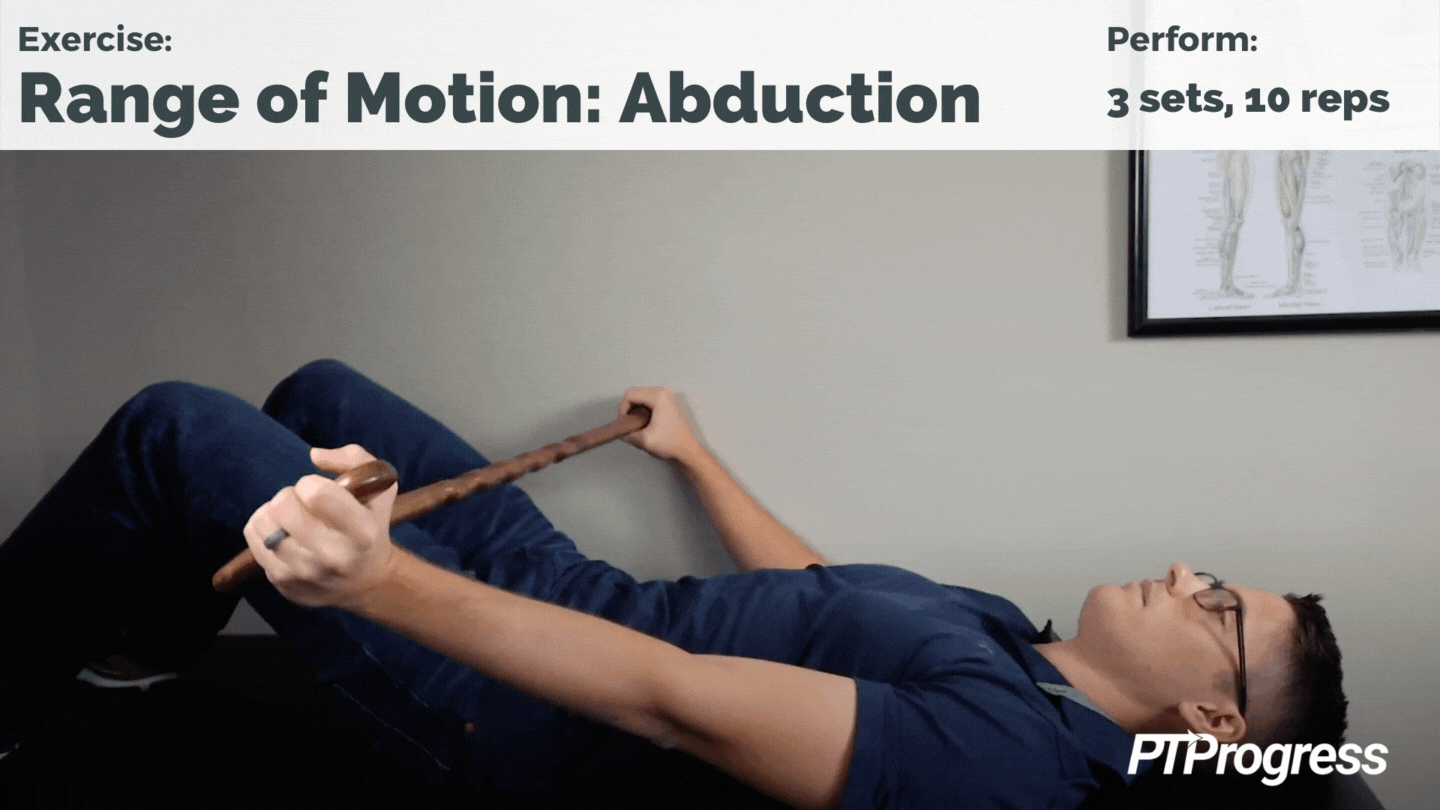
I know I said I’d give you 9 exercises, but why not round it out with a tenth one? This bonus exercise requires a cane or broomstick—something solid and longer than shoulder width. The stick will help support your arm so you can achieve as pain-free a range of motion as you can.
Lie on your back and hold the stick in both hands in front of you. Raise your arm up into flexion or overhead, as far as you can without pain. Move through your range, smoothly back and forth.
This diagonal movement encourages your shoulder to rotate and flex, and by lying down you can use gravity to lightly offload the shoulder. As you start to experience less pain in your shoulder, try this exercise while standing. You can even later add resistance, stretching a secured resistance band instead of holding a cane.
Whatever your range allows, aim for 3 sets of 10 repetitions each day.
Shoulder Impingement Handout
I know 9+ exercises is a lot to remember, so I created this helpful handout that you can download for free. It includes crisp demonstration photos and instructions for these effective treatment exercises you can easily follow at home.
The good news is that you don’t have to let your shoulder impingement cramp your lifestyle. By regularly performing the above exercises and stretches in a home treatment plan, you can relieve your shoulder pain while also addressing the problem at its source. You can also try using an ice pack for 20 minutes as a pain management technique.
For more ways to improve your posture, treat shoulder injuries, and strengthen the rotator cuff, check out the rest of the blog!