Do you suffer from chronic pain as a result of a rotator cuff injury? Are you looking for rotator cuff exercises? You’re not alone. Every year, over 3 million people sustain injuries to their rotator cuff. That’s a lot of pain to manage.
Research shows that non-operative treatment demonstrates a 75% success rate in rotator cuff patients – even 5 years after the treatment.
Exercise Can Help Rotator Cuff Pain
So what are these non-operative treatments? We’re not talking about a gimmicky quick fix, but careful rehabilitative exercises sustained over a period of time – AKA, physical therapy.
As a physical therapist myself, I’ve witnessed such results. Physical therapy treatment can delay or even eliminate the need for surgery in patients with rotator cuff injuries. Many of my patients with a partial- to full-thickness tear in their rotator cuff experienced significant improvement in their mobility and pain after just a few weeks of physical therapy.
If you are experiencing shoulder pain or considering surgery for your rotator cuff, you, too, could benefit from these exercises. Each of these movements is simple to learn and easy to perform at home with minimal equipment.
10 Rotator Cuff Exercises for Nonsurgical Rehab
I’ve put together this list of 10 rotator cuff exercises I share in the clinic with people who suffer from rotator cuff pain.
Before doing any of these movements, be sure to check with your own PT or surgeon. Just because these exercises will benefit most patients doesn’t mean you shouldn’t still be careful.
These exercises are part of my non-surgical rotator cuff rehab program. If you’ve already undergone surgery and are in recovery, you should follow the timeline and protocol given by your surgeon and PT.
Finally, these first three exercises might seem really basic, but they’re essential for people with limited motion. Don’t skip them! By performing these exercises first, you’ll establish your range of pain-free motion before moving on to strengthening exercises.
1. Pendulum
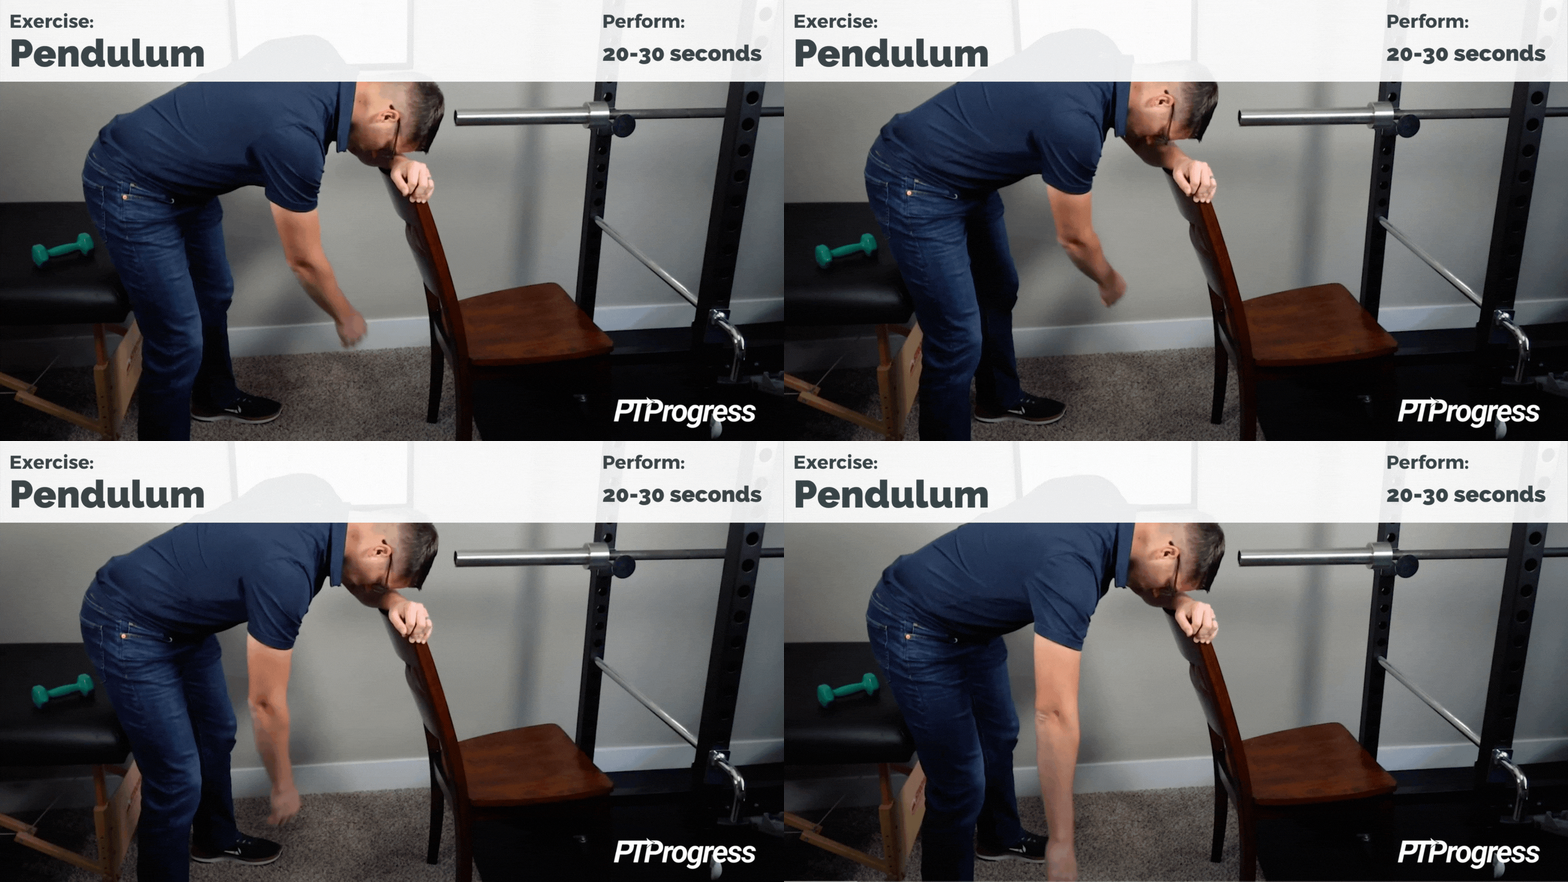
Stand with your feet about shoulder-width apart. Hold onto a chair or countertop in front of you and bend over to allow your pained arm to hang suspended.
Keep your arm as relaxed as possible, shifting your body to swing your arm like a pendulum back and forth. You can even set it in a circular motion, alternating directions. Aim to sustain this motion for 20 to 30 seconds at a time, multiple times a day.
This exercise is simple, but it works wonders. The light suspension relieves pressure in the shoulder by “distracting” the shoulder joint, or creating a gap between the joint surfaces. You can increase this load distraction by holding a small weight – something light, one or two pounds tops.
This exercise takes only a few moments to perform, but when done throughout the day, it can significantly relieve pain.
2. Scapular Retraction
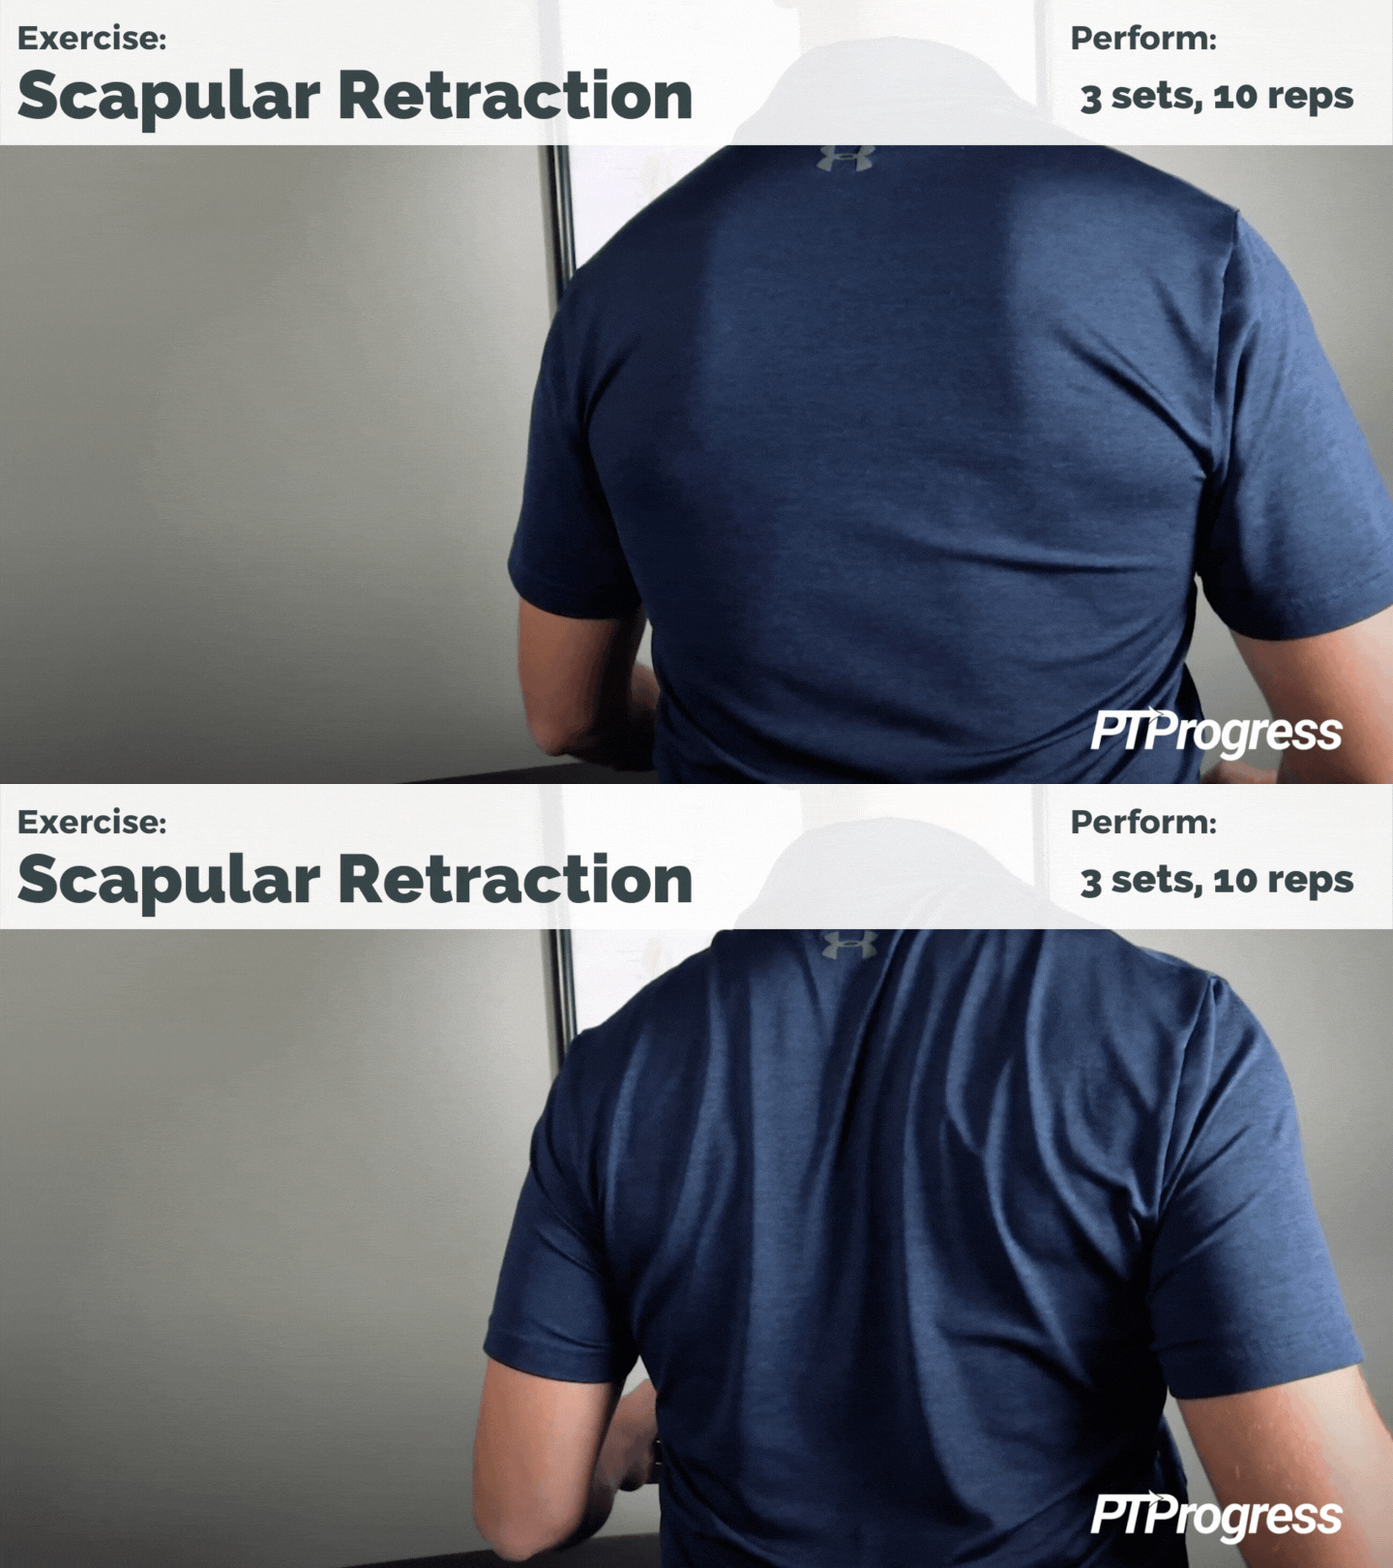
The name might sound intimidating, but “scapular retraction” simply means “shoulder squeezes.” Retraction not only improves your overall posture but also activates the muscles that support the shoulder and rotator cuff.
Keep your neck relaxed as you squeeze your shoulder blades together, holding for about 1 to 2 seconds at a time. Repeat 15 to 20 times.
This simple exercise is perfect to do every couple of hours, especially if you work behind a computer or find yourself sitting for long periods of time.
3. Assisted Range of Motion
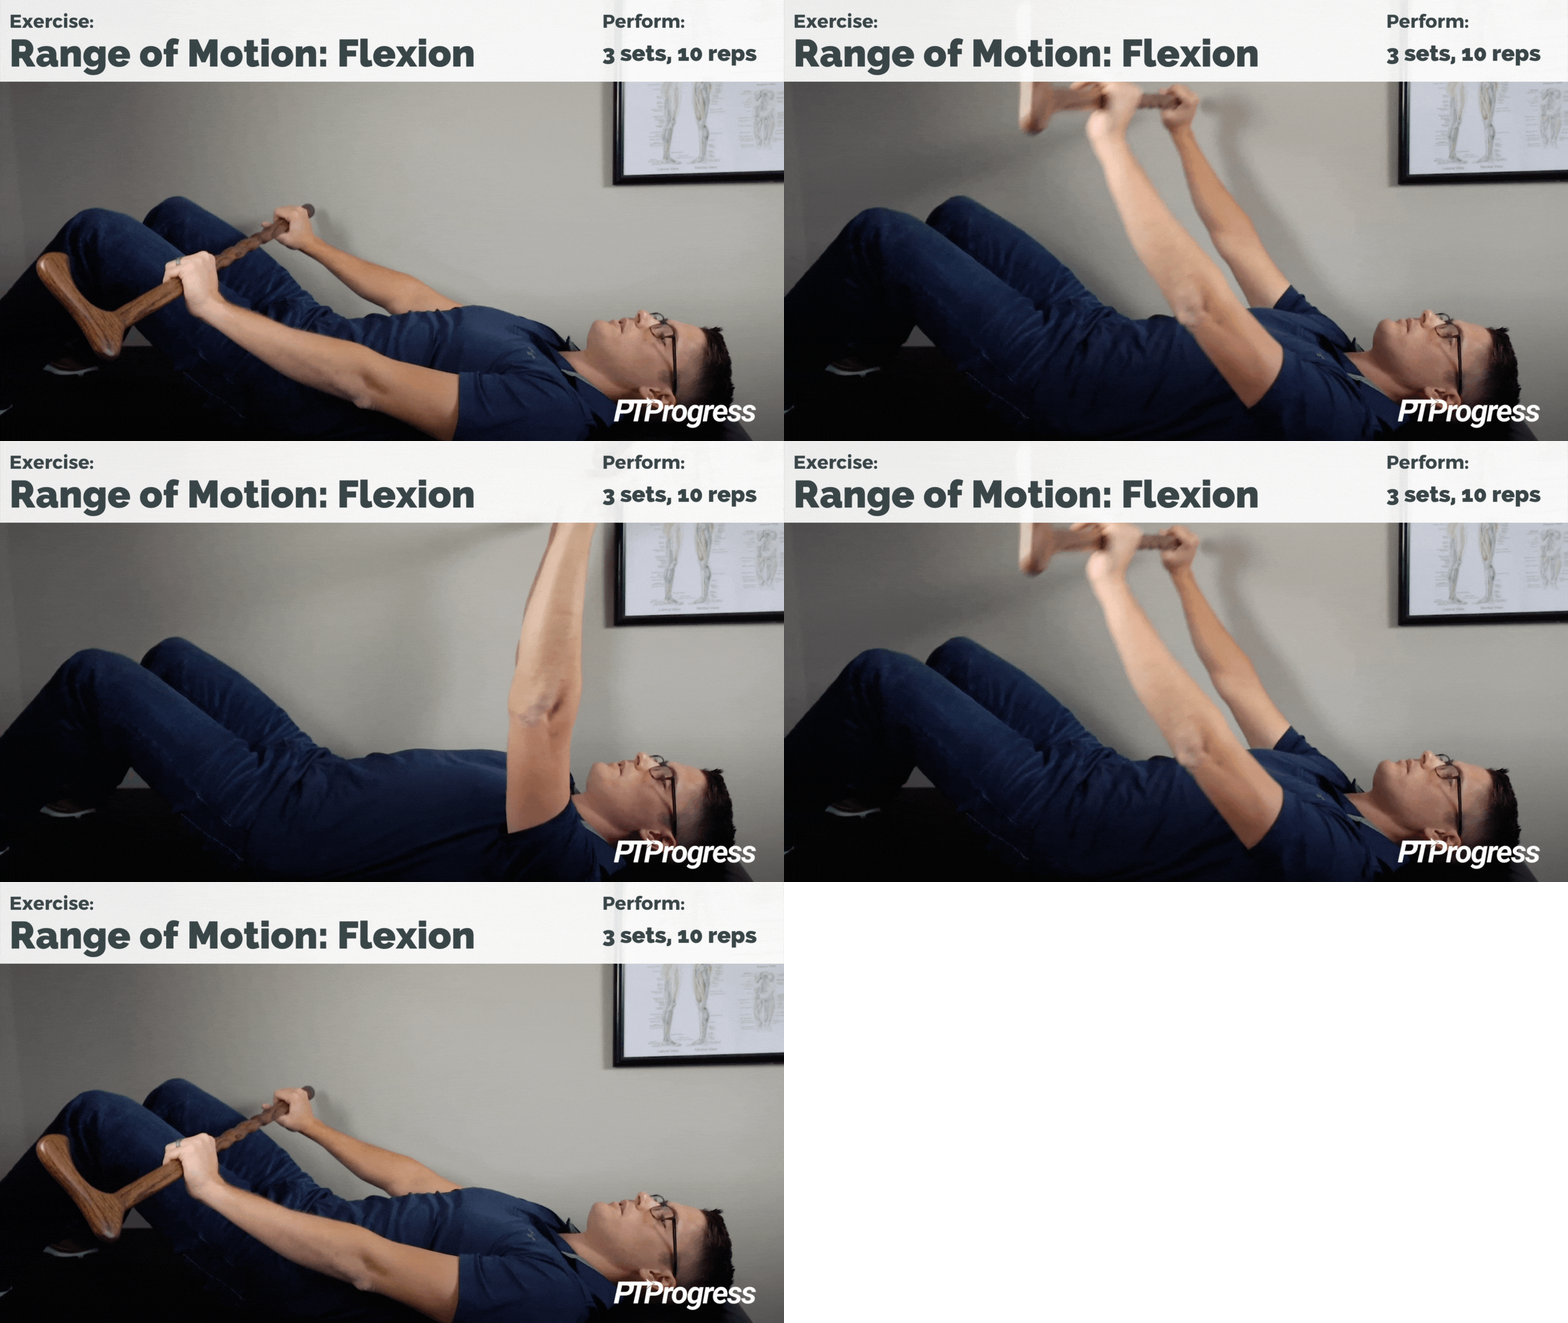
For this exercise, you’ll need a flat surface and a stick. Any long stick will do, such as a broomstick or golf club. I use a handmade oak cane from Brazos down in Waco, Texas, but yours needn’t be so fancy as that.
Lie on your back with your knees comfortably bent. Hold the stick with straight arms extended toward your knees. Slowly raise your arms into full flexion: over your body and towards your head in an arc. If you can’t raise your arms past your shoulders, don’t force it; stop at the point where you start to feel discomfort. Then lower your arms back to the starting position and repeat the movement 10 to 12 times.
Perform this exercise 2 to 3 times each day, and you’ll soon notice improvements. You’ll find you can go further and further overhead each time, and it’ll become a lot easier, especially if your injury is pretty recent.
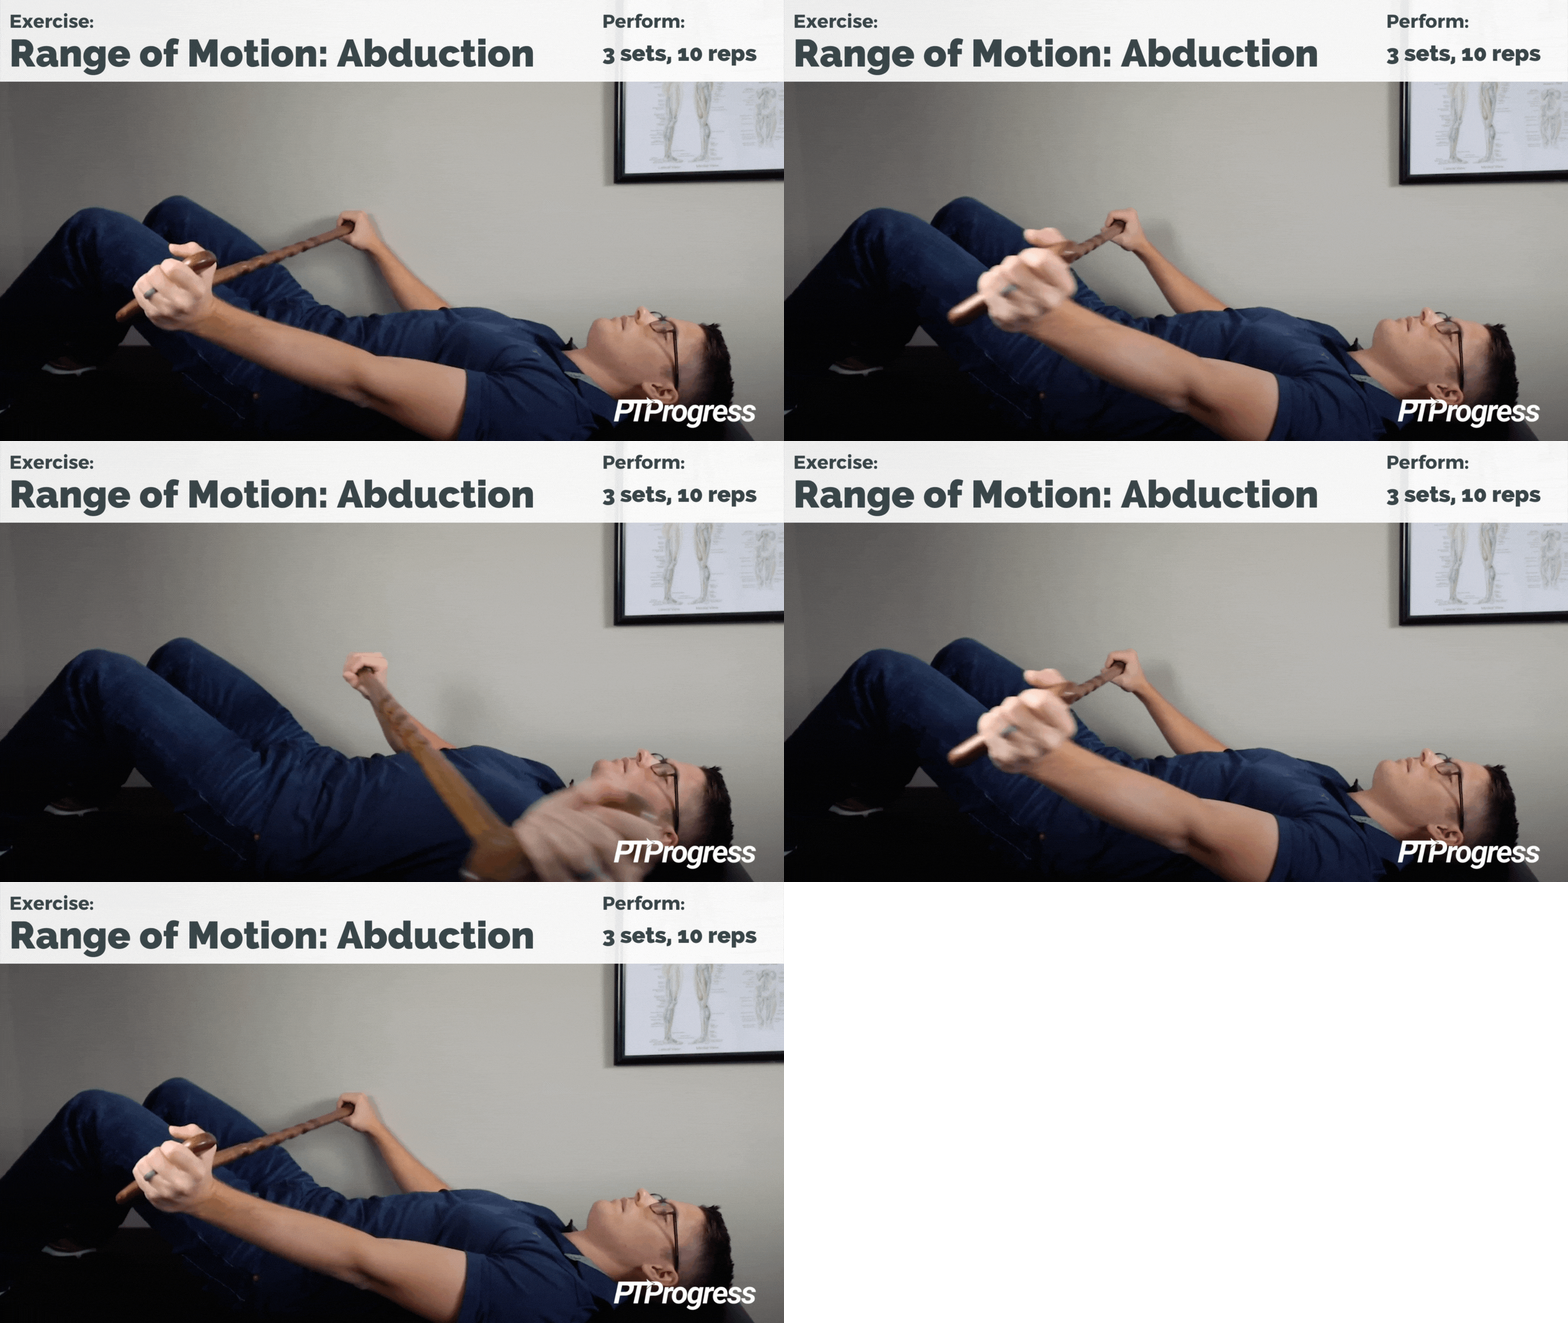
You can also try using the stick to bring your arm out into abduction: that is, out to the side. This is usually a little more uncomfortable initially, so use a pillow under your arm for support. When first starting, use your good arm to push most of the weight, then gradually rely on the surgical arm, granted there is no pain.
Whether you’re performing the flexion or abduction movements, perform 3 sets of 10 reps, holding your furthest point for 5 seconds at a time.
4. Serratus Punch
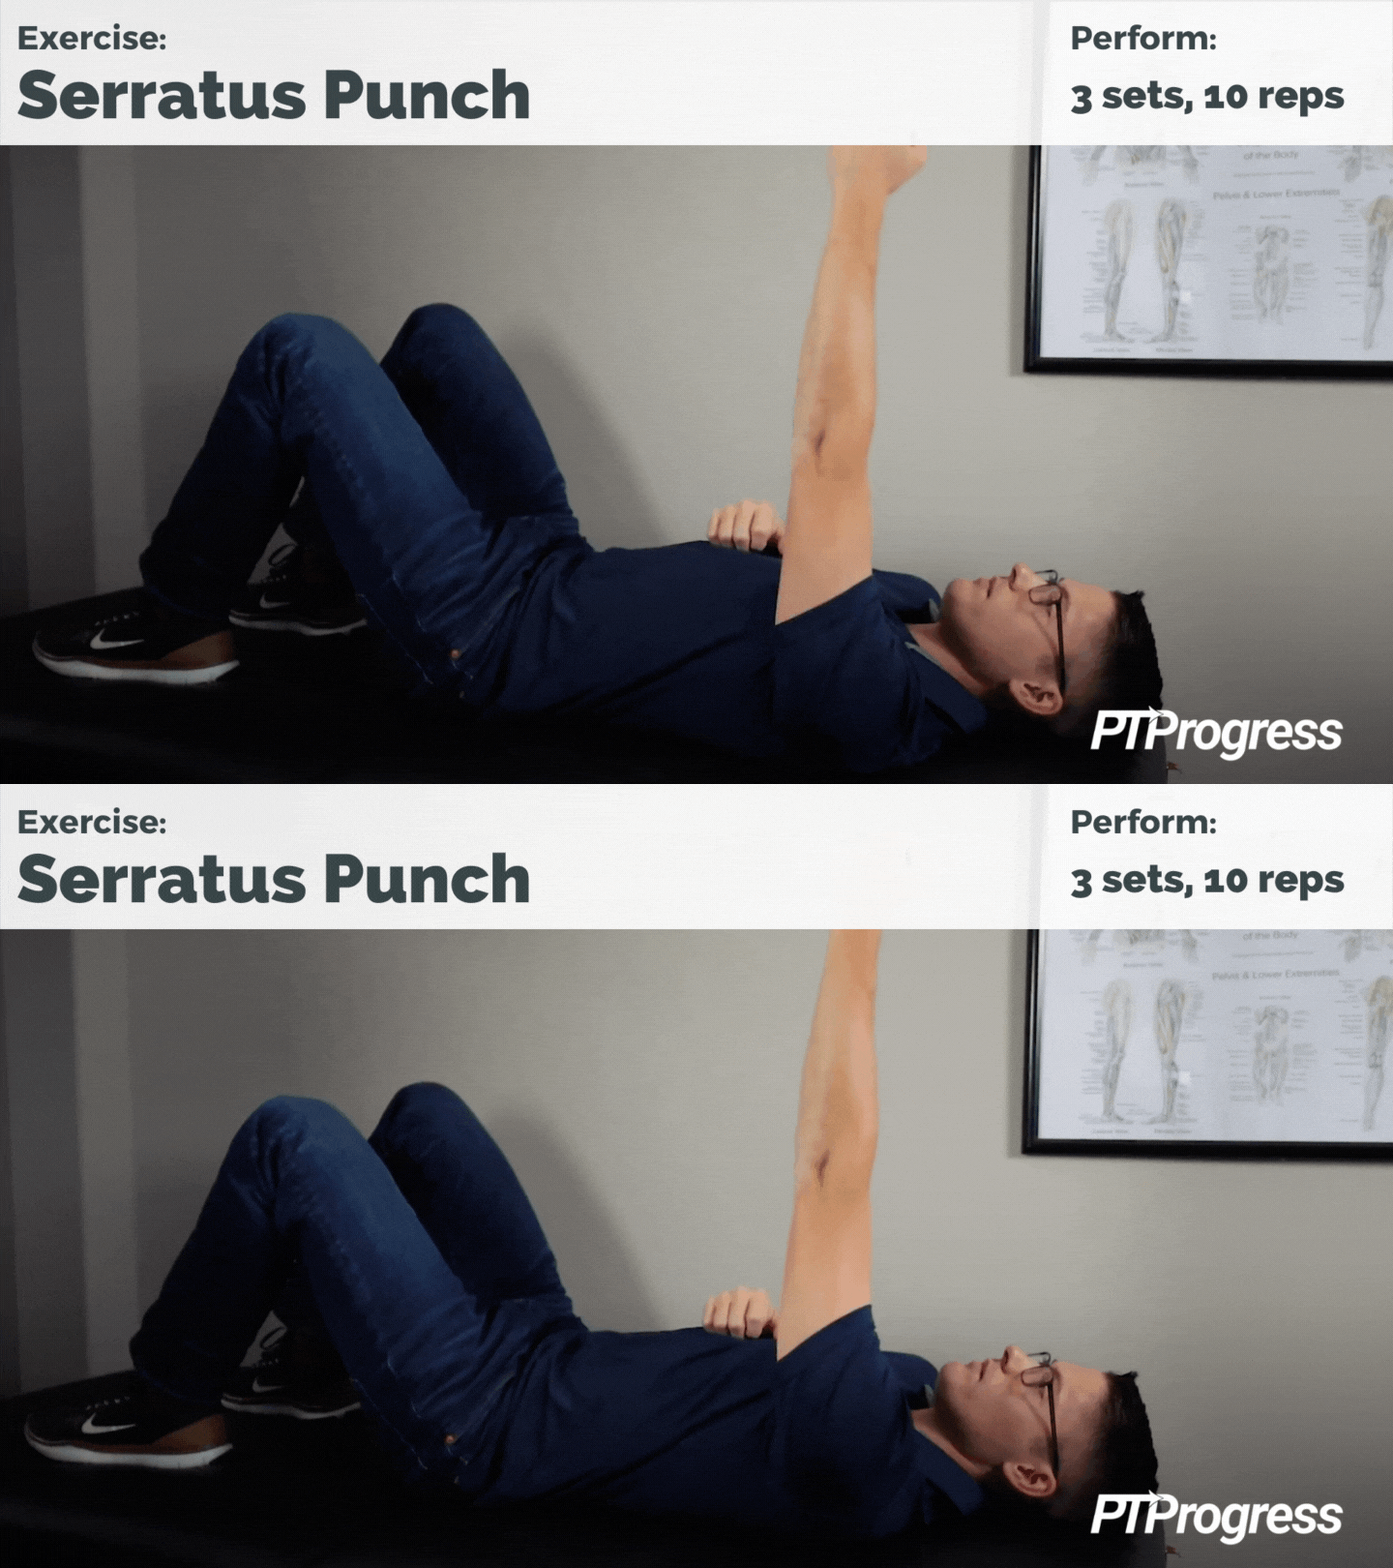
This exercise is called a Serratus Punch because it targets the serratus anterior muscle near your upper ribs.
While lying on your back with your knees comfortably bent, raise your arm to 90 degrees. From the back of your shoulder, reach forward as if you’re performing a slow punch to the ceiling. Return the back of your shoulder to the floor and repeat the punch.
You can perform this exercise without any weight to start, but if it feels comfortable, try holding a 1- or 2-pound weight as you progress. Aim to perform 3 sets of 10 to 12 repetitions of this exercise.
5. Wall Slide
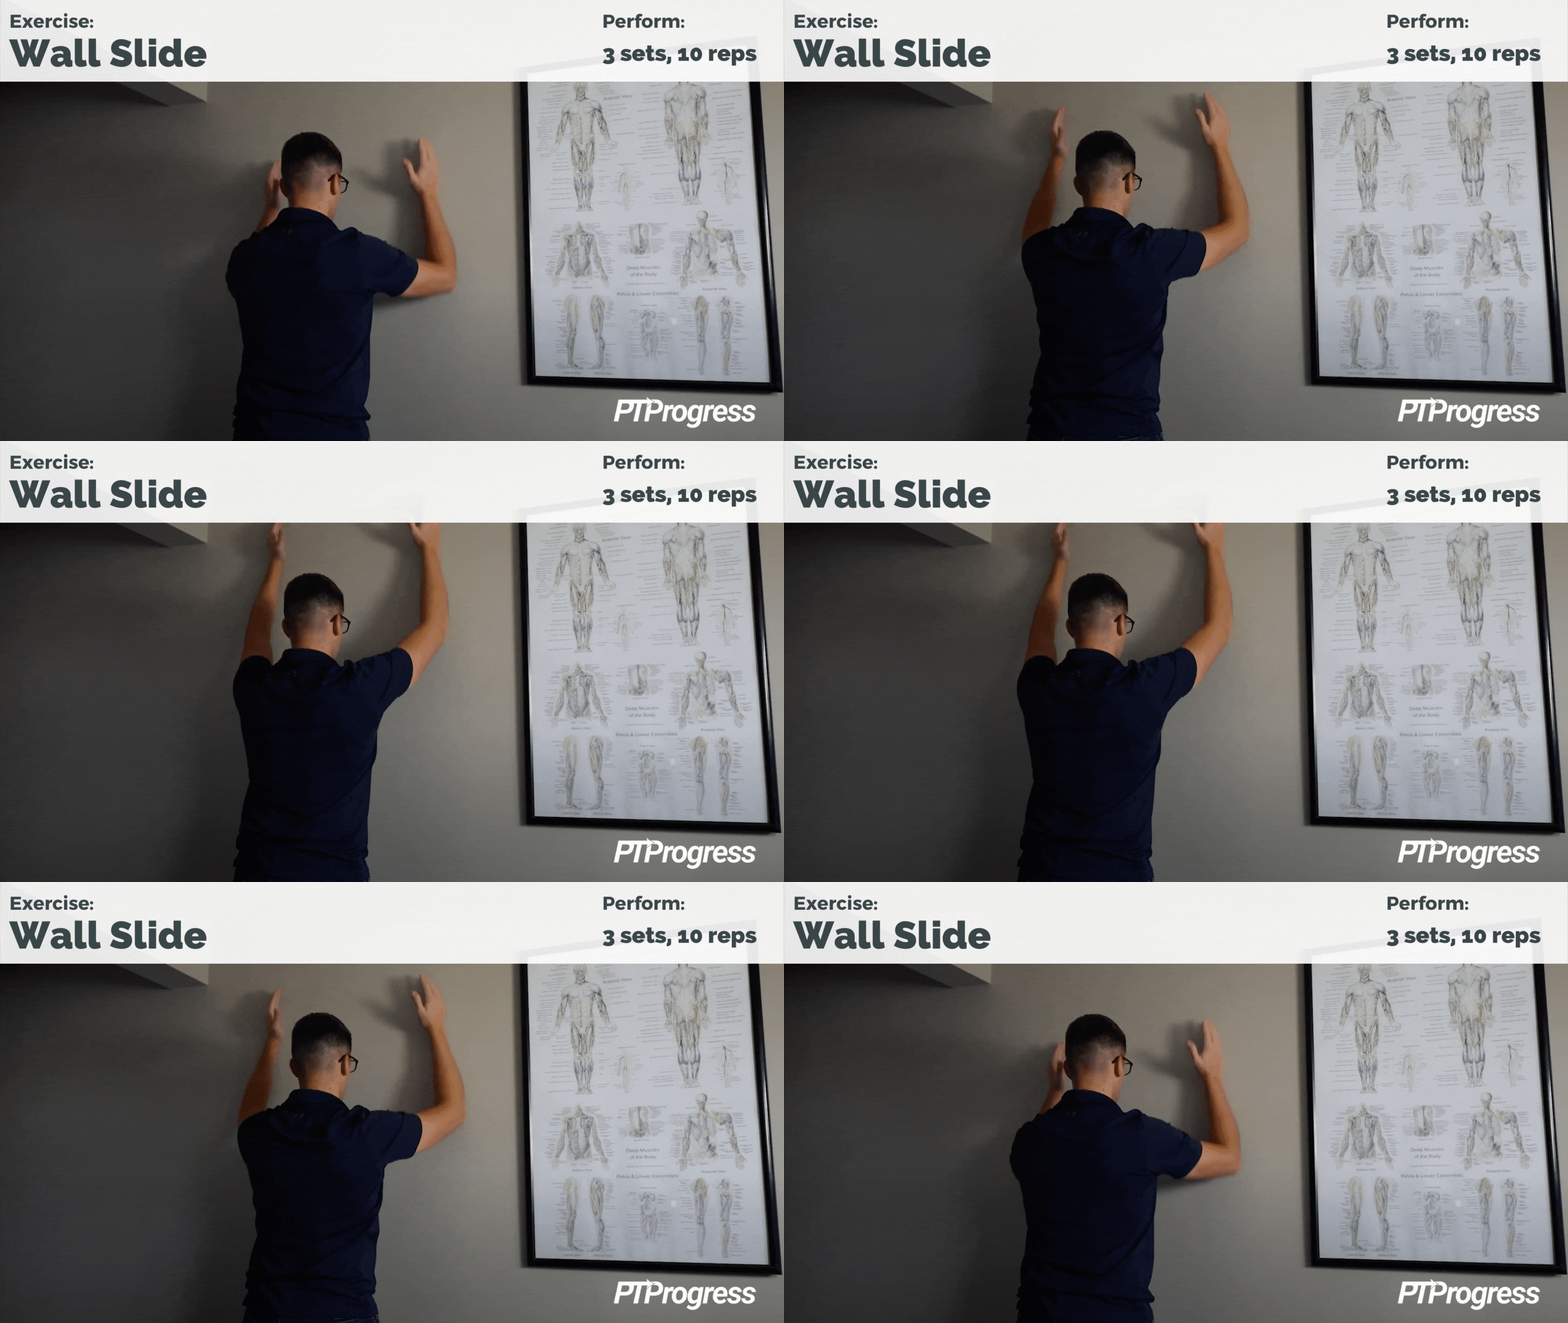
Oftentimes, a patient with a rotator cuff tear struggles to raise their injured arm overhead, which poses a problem when trying to reach behind the head or into cabinets. They’re often surprised by how high they can reach when they use a wall for support. As simple as it sounds, you can use this supported reach as a way to gently exercise your shoulder.
Face the wall and place your forearms flat. Keep your neck relaxed as you slide your arms up the wall, reaching only as far as you can without pain. Make sure your arms are relaxed as you slide them back down.
You don’t need to repeat this movement incessantly, but I recommend 2 to 3 sets of 10 to 15 wall slides a day.
6. Countertop Plank
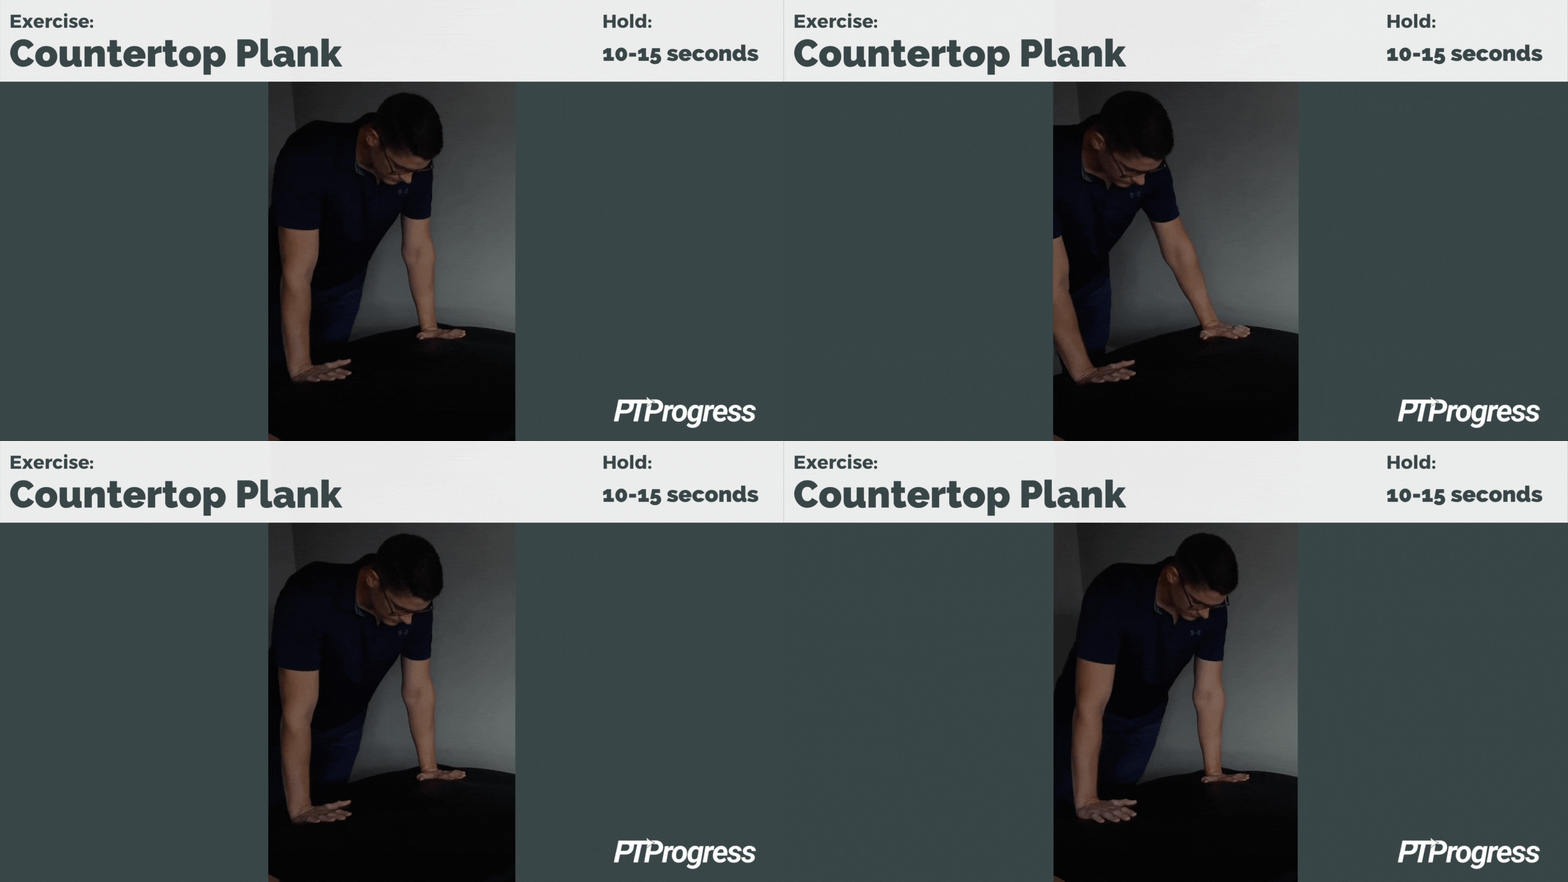
I like this movement because it promotes stability in the shoulder and can be performed anywhere there’s a countertop.
Place your hands shoulder-width apart and hold the position for 10 to 15 seconds. You can even shift your weight towards one arm and back to center, slowly and gradually. As you progress in strength and stability, try lifting one arm to shoulder height while you shift your weight, alternating sides.
Since it’s a short, simple exercise, you can incorporate this plank throughout your day whenever you are in the kitchen or bathroom or near an available counter.
7. Side Lying External Rotation
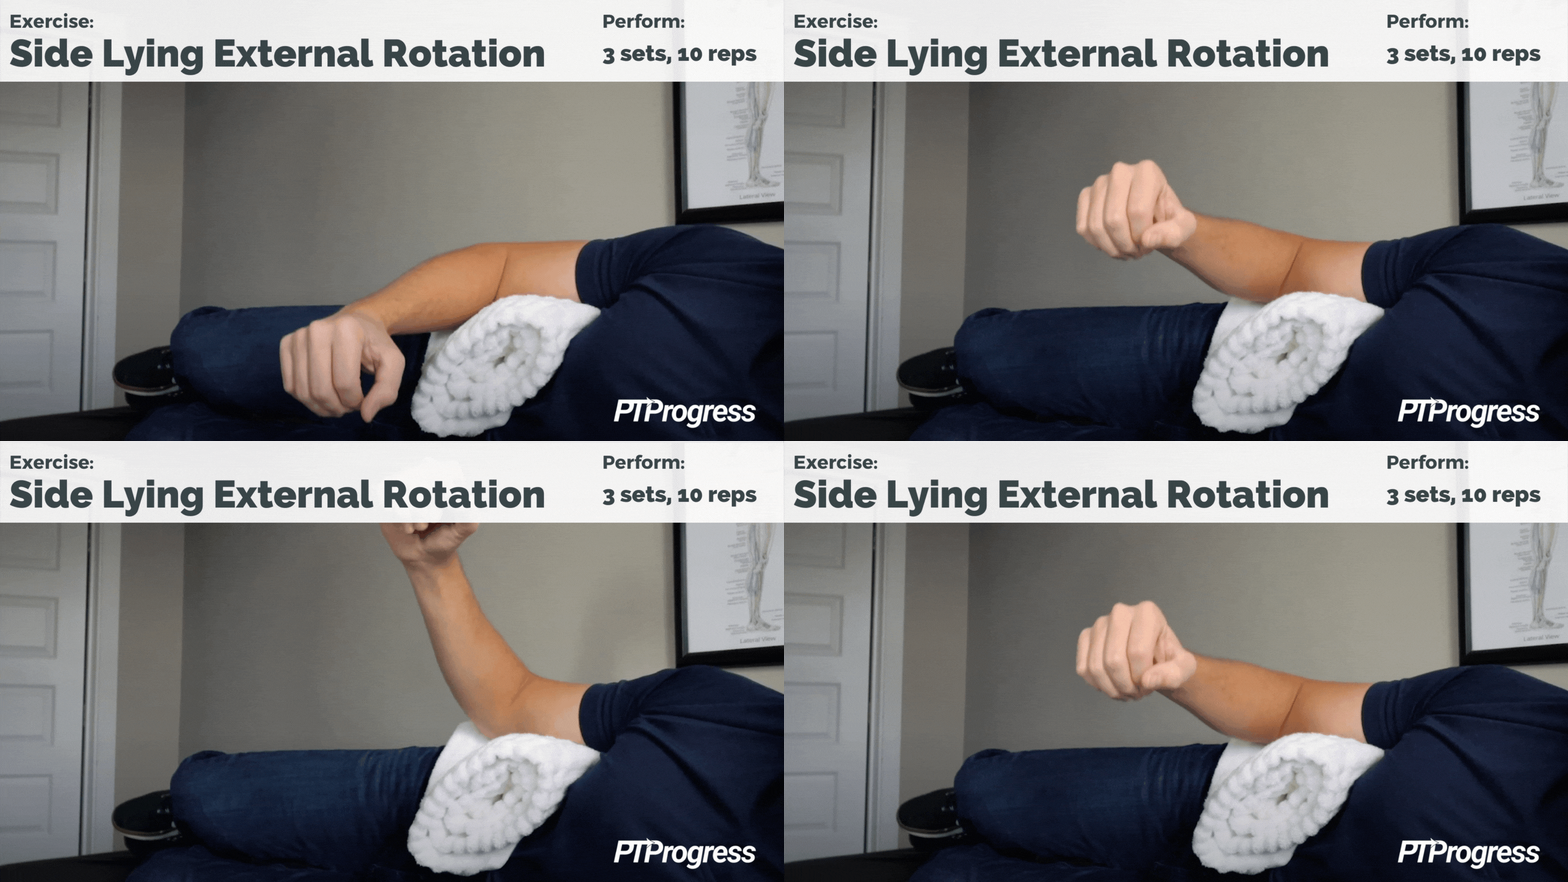
A Side Lying External Rotation exercise functions to isolate the rotator cuff muscles. In fact, you’ll use 3 of your 4 rotator cuff muscles to perform this movement, making it especially painful for someone with a rotator cuff tear. Be careful to perform this movement within a pain-free range of motion.
Lie down on a flat surface on your side. Before you start, place a rolled up towel under your elbow between your arm and your body. The towel will help you avoid straining your shoulder and isolate the muscles you need to strengthen. Gently rotate your arm like you’re spinning it on a rod or swinging from a hinge, until your hand points towards the ceiling. Take care not to lift your arm like a chicken wing as you move through this motion.
Because this movement is tricky for rotator cuff tears, it’s better to begin without any weight. However, after a few days, you may be able to add a small weight (0.5 pound to 2 pounds) as your mobility and strength allow.
Aim to perform 2 to 3 sets of 10 repetitions of this exercise. Of course, stop the exercise if you’re experiencing pain in your shoulder and switch to other pain-free movements instead.
8. Resisted Row
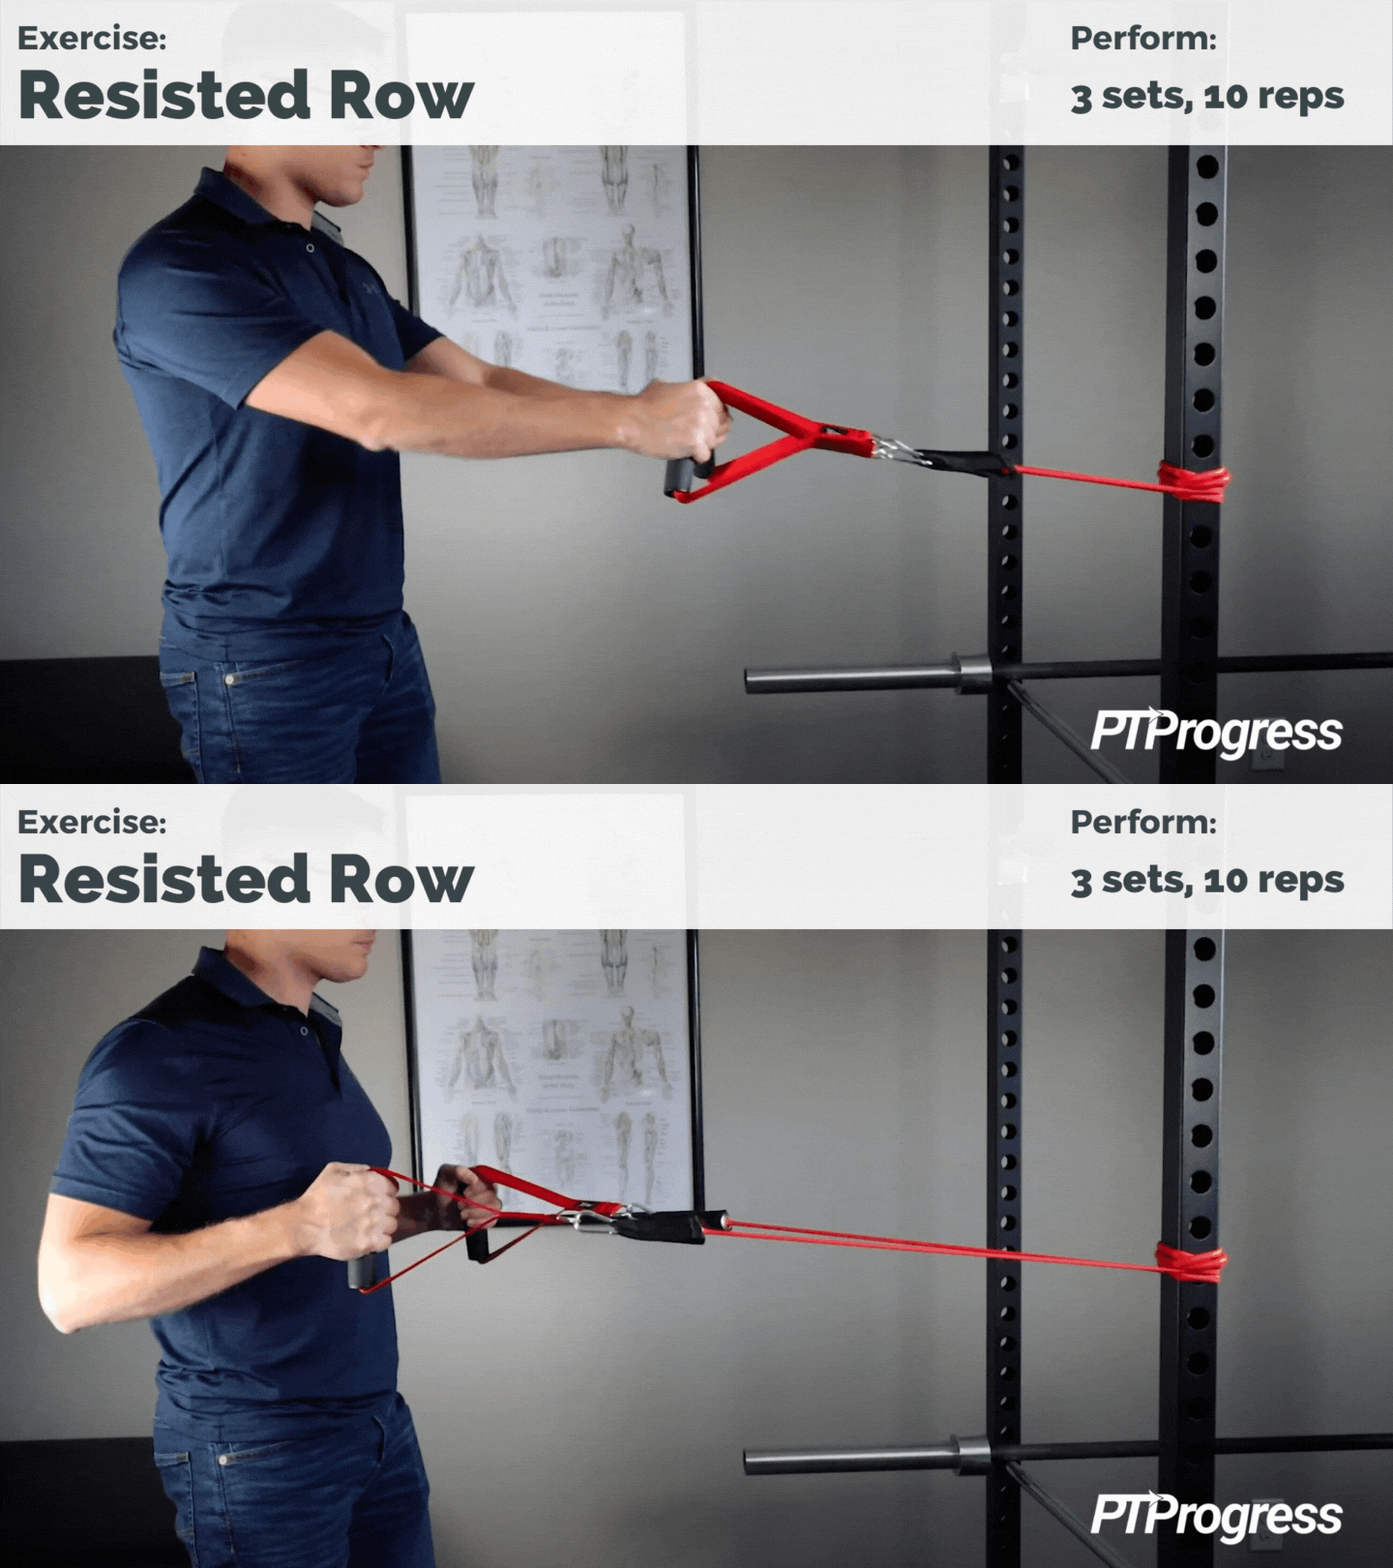
For the row exercises, you can break out the big weights – resistance bands! Physical therapists rely on resistance bands for a wide range of exercises because they are easy to use, easy to scale, and easy to store. The bands I use are from Bob and Brad, a couple of physical therapists from YouTube with their own line of helpful products on Amazon.
A resisted row essentially adds weight to the Scapular Retraction exercise you performed earlier. Just as before, keep your neck relaxed and squeeze your shoulders together as you bring your arms towards your body, pulling on the resistance band from the back of your shoulders. You don’t need much resistance to engage your shoulder muscles, so I like to start patients on a red or yellow band and have them work up to the green band. I recommend wrapping the band around a sturdy pole for an even distribution of resistance.
Although the movement should not be painful, you may find it tiring after 2 to 3 sets of 10 repetitions.
9. Resisted Internal / External Rotation
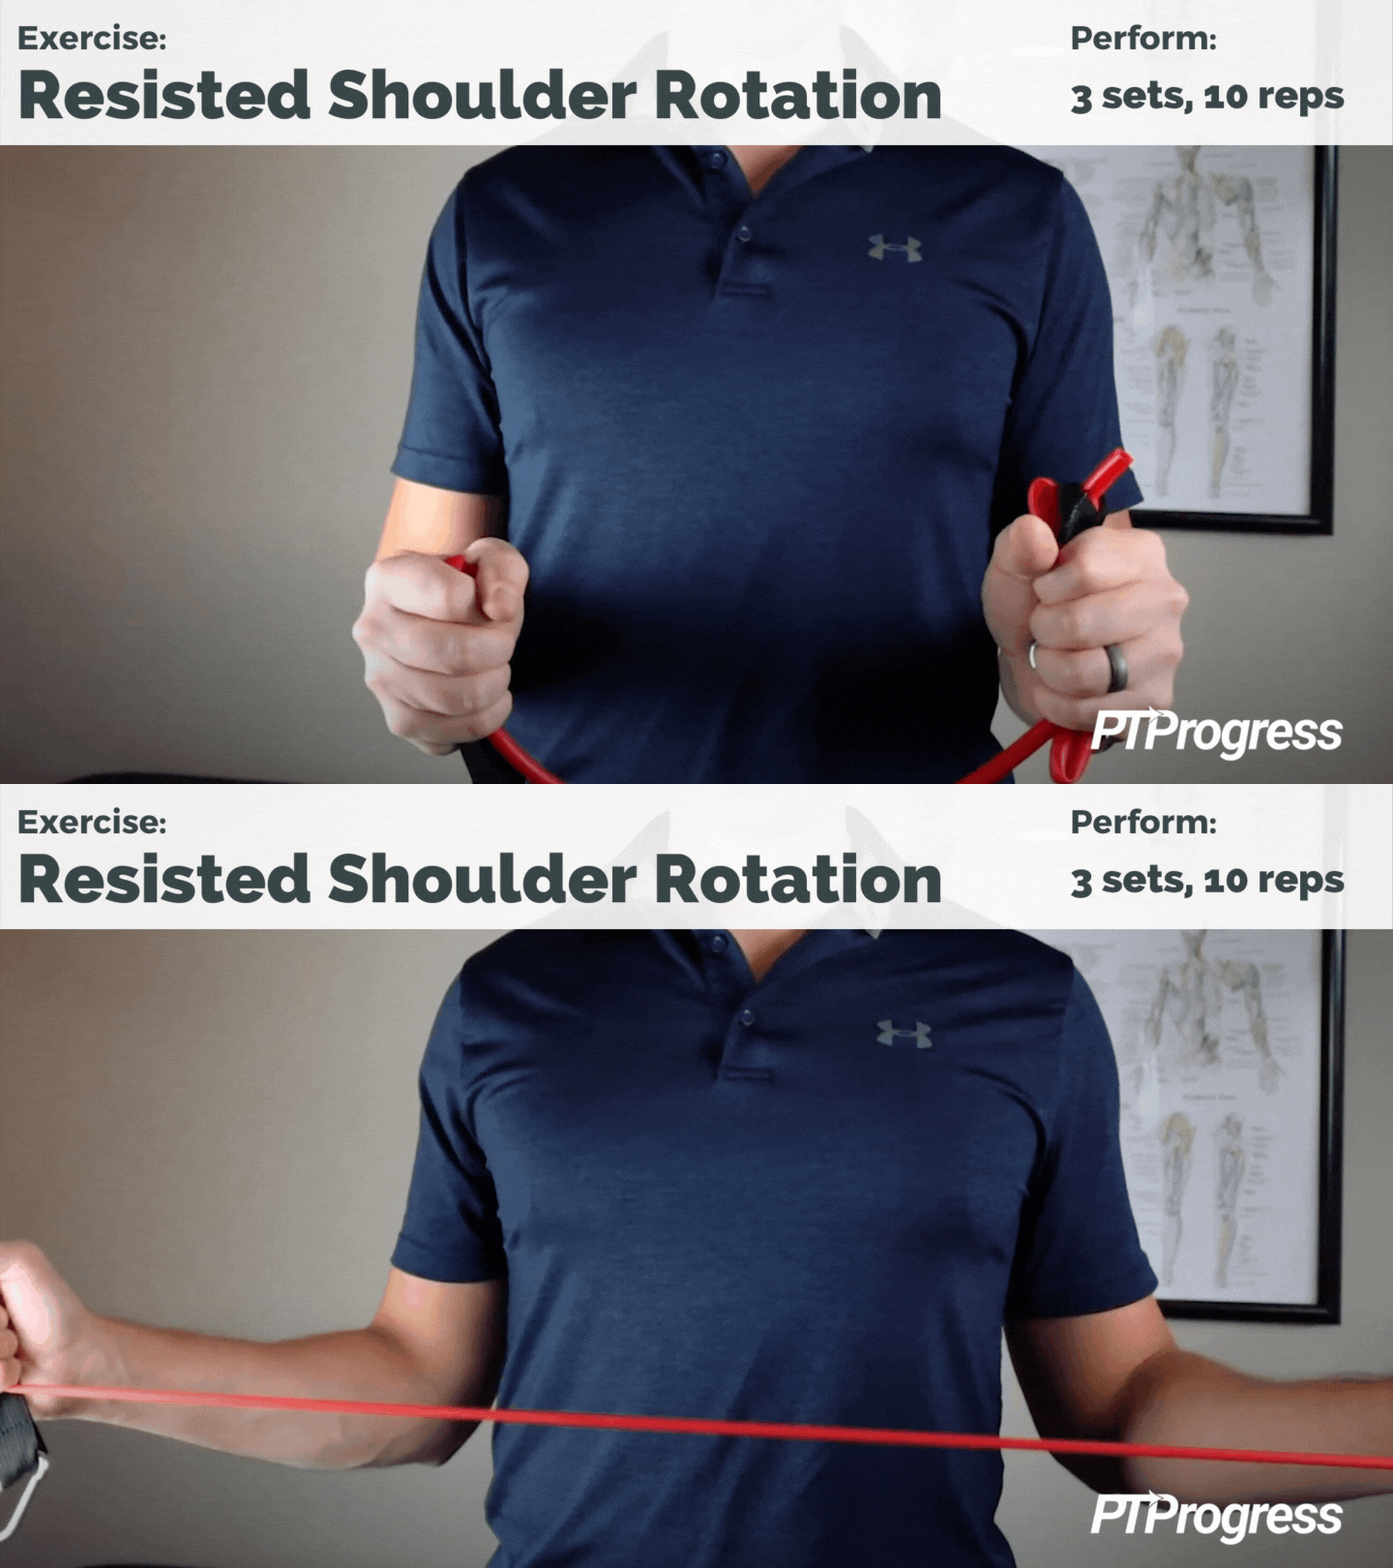
You can perform this exercise two ways. First, hold one end of the resistance band in each hand and stretch the band apart while keeping your elbows at your sides at a 90º angle. To help stabilize your shoulders, squeeze your shoulder blades before you initiate the rotation with your arms.
The other way is to exercise one arm at a time. If you have a door loop for your resistance bands, you can slide the loop in a closed door, or you can wrap the band around a sturdy pole. Hold the end of the band and keep your elbow at your side at a 90º angle. Pull the band away from the door by opening your forearm out like a door hinge.
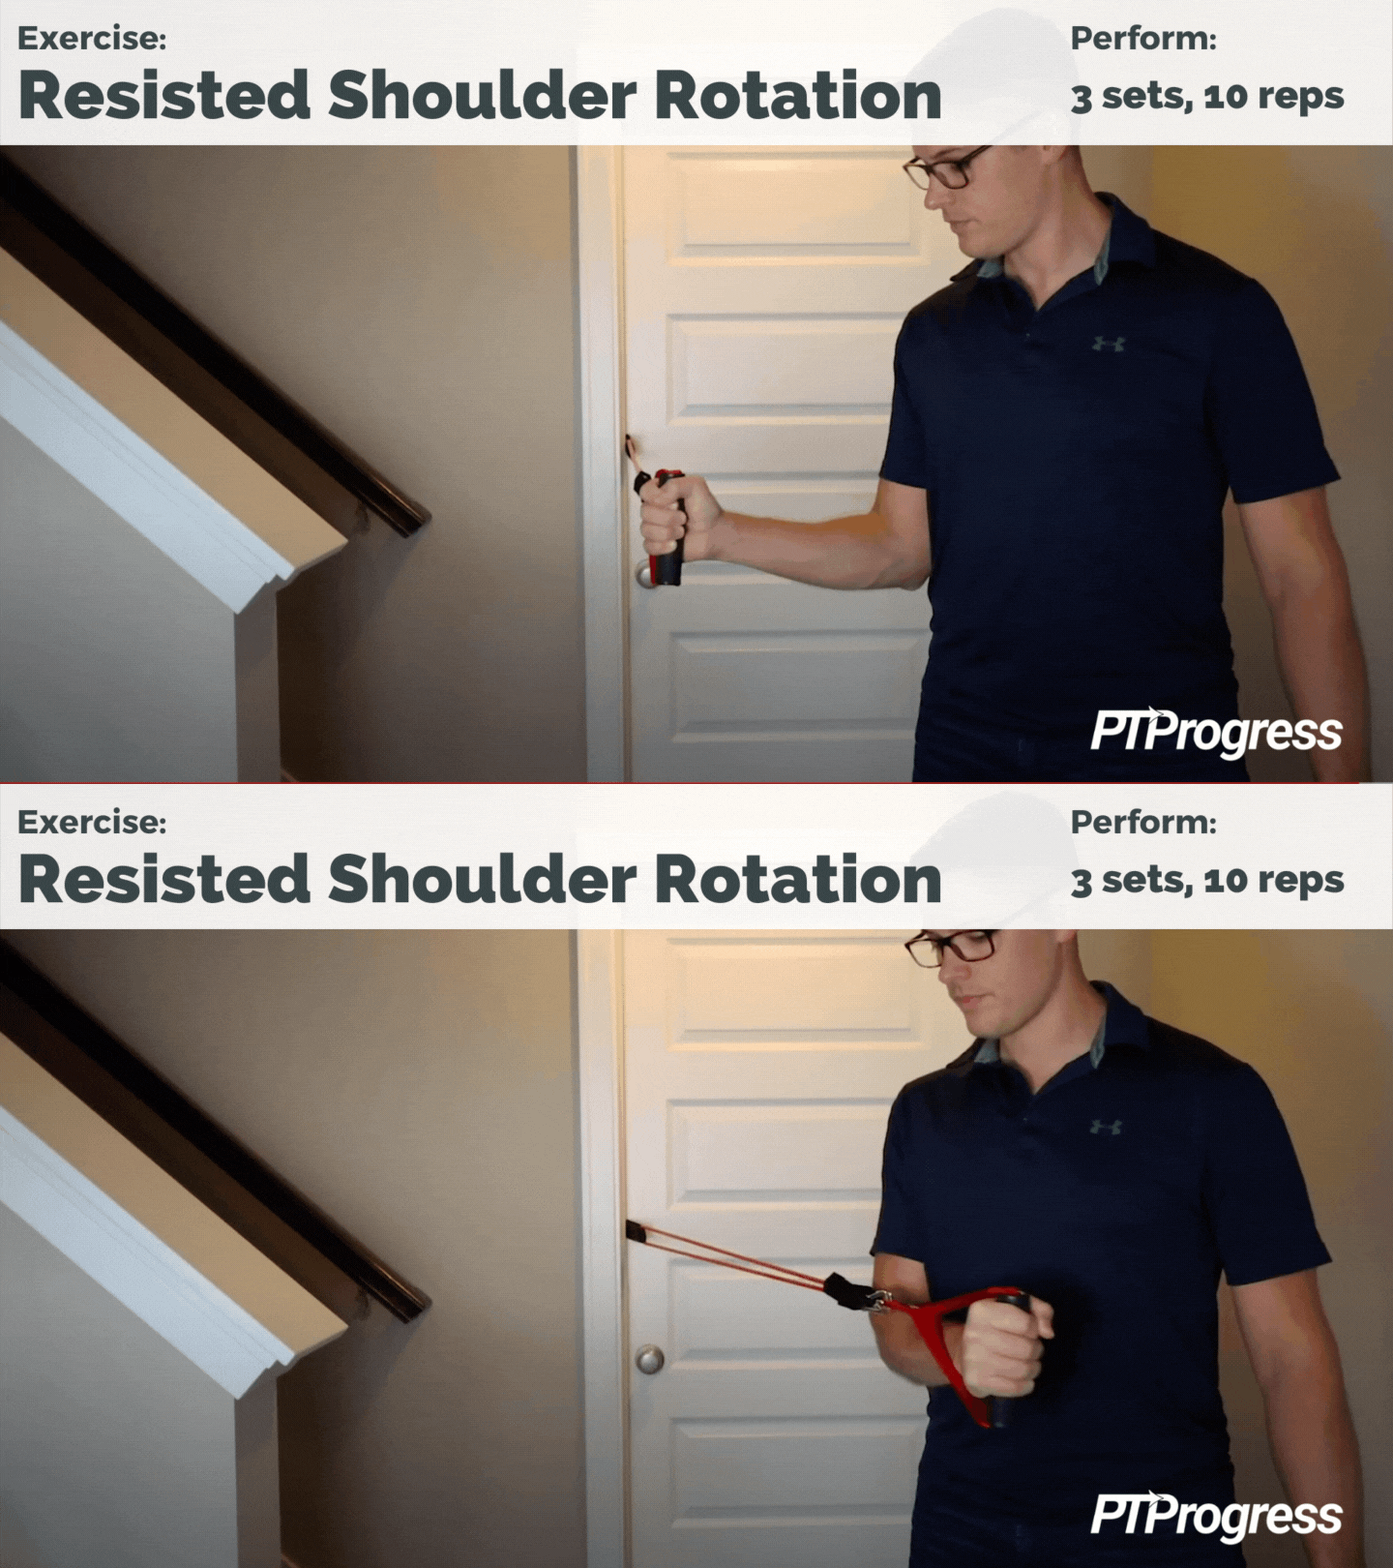
This is a good way to isolate your rotator cuff, and you can use it to target both external and internal rotation. To increase resistance, slightly turn away from the door as you return your arm to the start position.
Like most of these strengthening exercises, try to perform 2 to 3 sets of 10 repetitions as long as the movements are pain-free.
10. Diagonal Band
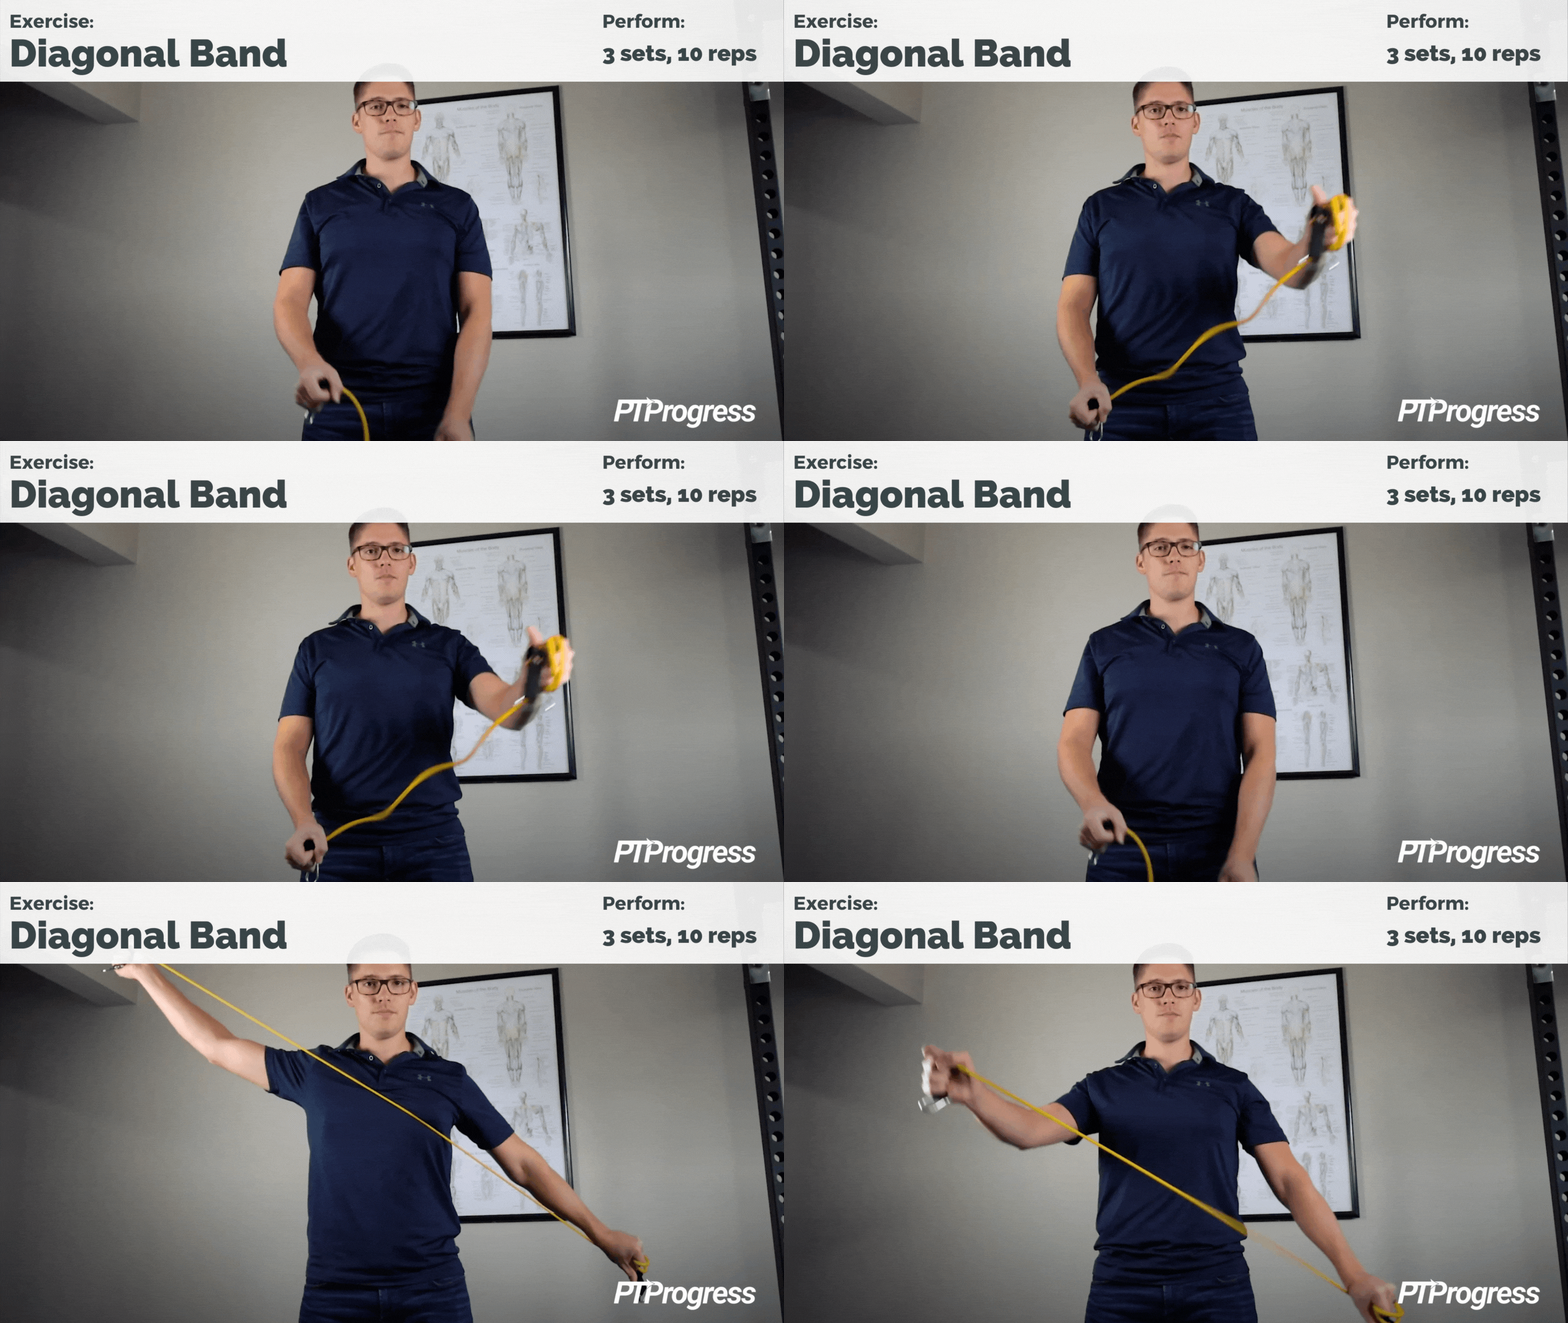
Since this is a more advanced exercise, I recommend waiting a few weeks to perform this movement until you’ve seen improvement in the strength and range of motion in your shoulder.
Stand shoulder-width apart and hold one end of your resistance band in each hand. Start by squeezing your shoulders and stretch the band in a diagonal pattern across your chest – one arm reaching high while the other stretches low. Return to the starting position and repeat the movement in the opposite direction. As you alternate sides, focus on stabilizing your shoulders with the small squeeze of your shoulder blades.
If this movement is too difficult, use the wall for support. You can still use the resistance bands but have more stability and a more controlled range of motion.
Non-operative Rotator Cuff Exercises: A Reminder
Remember, the rotator cuff is extremely delicate and prone to injury, so always exercise caution when performing these movements. Progress through this list gradually, and only add weight or reps when it is comfortable to do so.
These exercises are part of a program I commonly give my patients for non-operative rotator cuff rehabilitation. If you need post-operative rehabilitation, be sure to follow the advice of your surgeon or physical therapist for optimal treatment.


