Looking to improve your balance? Research shows that balance exercises for seniors can significantly reduce the risk of falls.
Nearly 1 in 3 adults over age 65 will fall each year. It’s no surprise that falling is the number one cause of injury among senior adults.
Table of Contents: Balance Exercises
- Single Leg Stance
- Foot Taps to Step or Cone
- Narrow Stance Reaches
- 3 Way Hip Kick
- Standing Marches
- Mini Lunges
- Lateral Stepping
- Squats
- Tandem or Semi-Tandem Stance
- Heel Raises
- Hamstring Stretch (Standing or Sitting)
- Calf Stretch
- Balance Exercises for the Elderly
- Balance Exercises for Seniors PDF Handout
- FAQ
Falls can lead to serious injury, including hip fractures or other broken bones, head injury, brain injury, and even death.
The good news is that falls can be prevented with the right approach. Exercises, stretches, and balance training can lower your risk of falling.
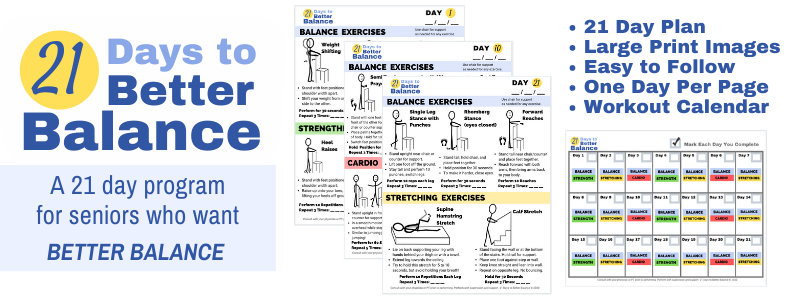
In almost every balance exercise handout I give my patients, I include a variation of these exercises to improve balance. In fact, I’ve put together an entire balance program, featuring over 40 exercises and a 21-day plan to improve balance. You can download the program here: 21 Days to Better Balance.
But if you’re new to this, start with the common exercises for balance l’ve listed here. You may progress to advanced balance exercises over time.
Top 12 Balance Exercises for Seniors
1. Single Leg Stance
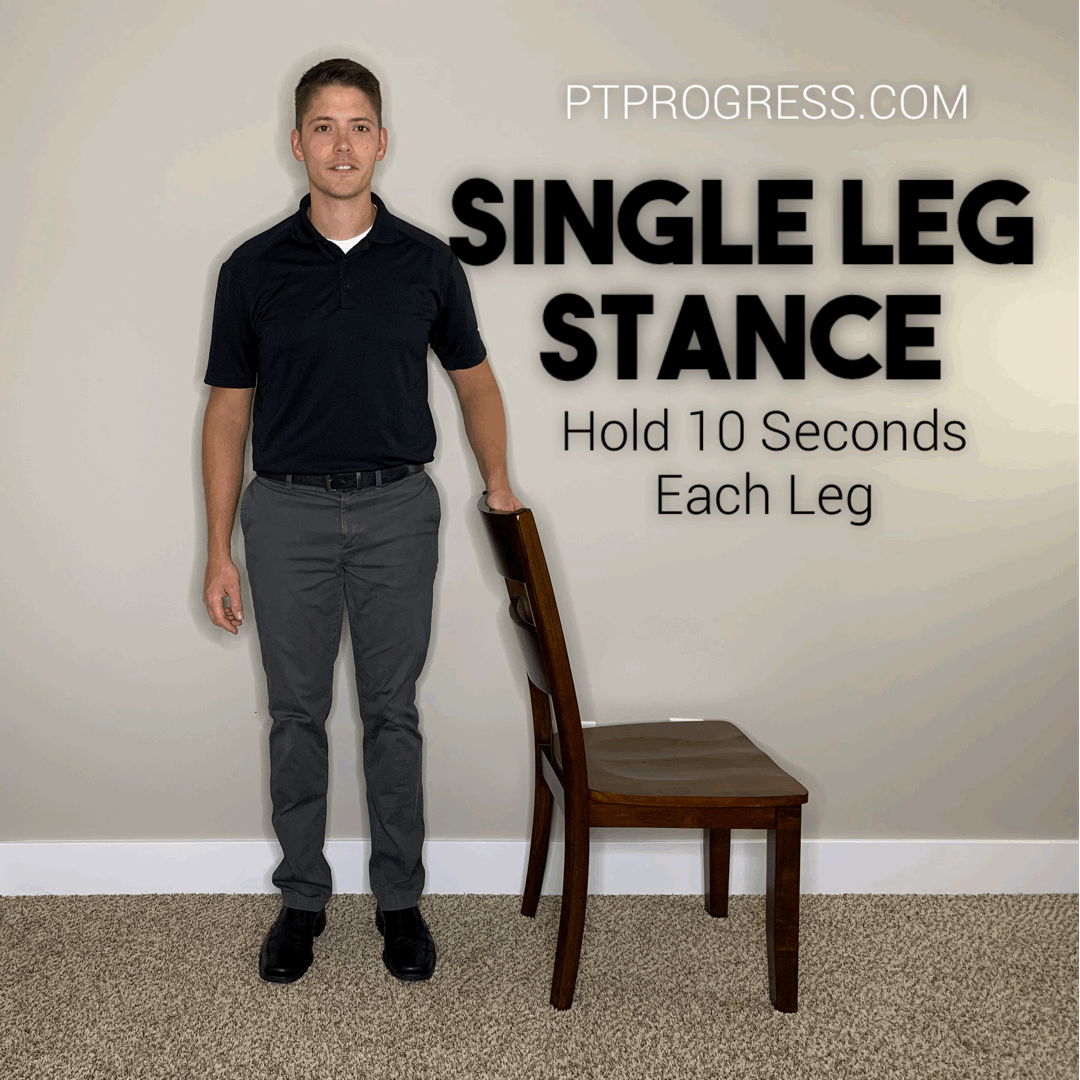
Instructions: Start with your feet at hip-width. While holding onto a counter, lift one foot off the ground slightly. Keep your body tall and avoid leaning onto your planted foot.
Advance this exercise by transitioning to one hand support and eventually no hand support. It’s always good to perform near a sturdy counter in case you need to quickly catch your balance.
Hold your foot up for 10 to 15 seconds. Repeat 5 times on each leg.
Why this is important: You stand on one leg every time you take a step or walk up and down stairs. Don’t underestimate the importance of the single-leg stance exercise!
2. Foot Taps to Step or Cone
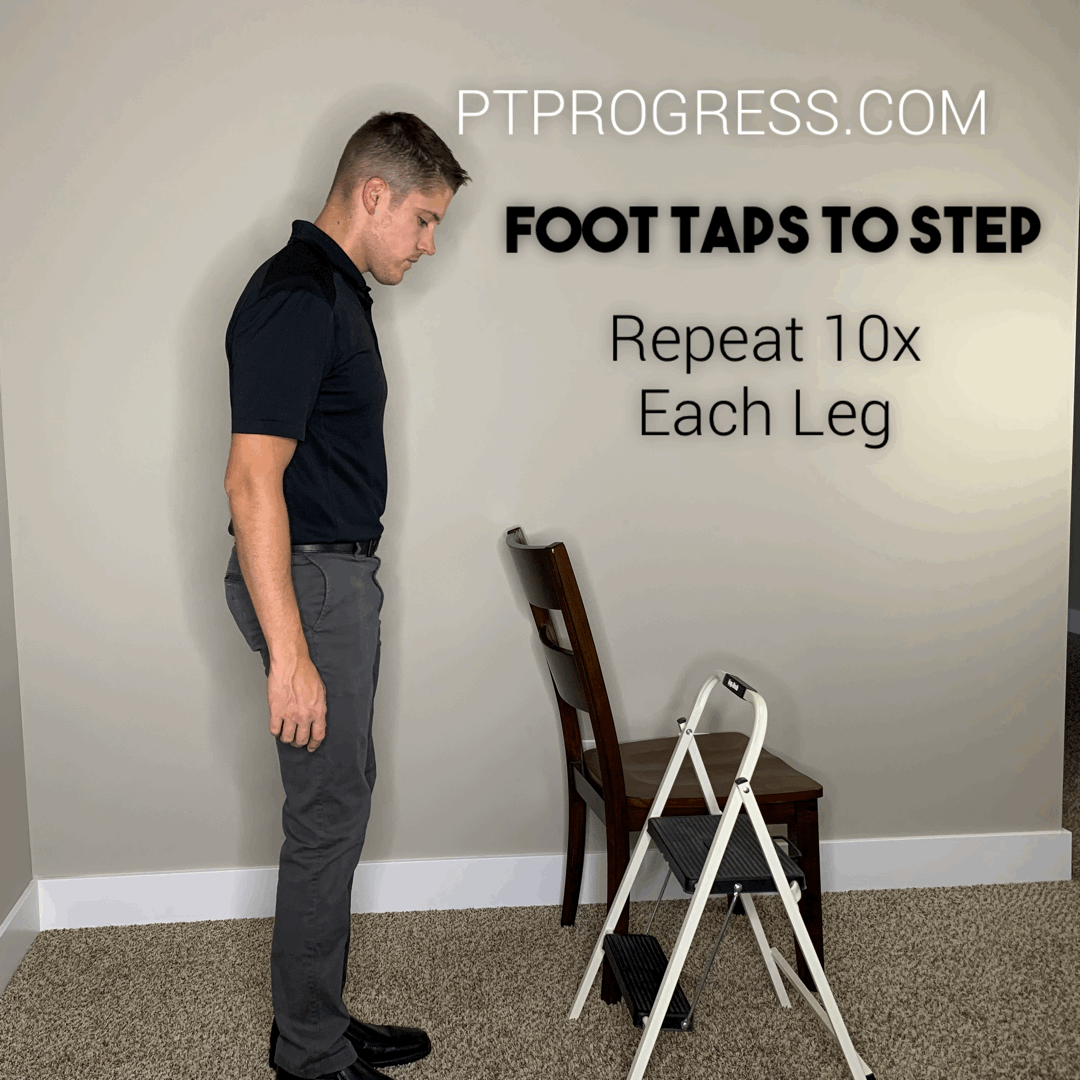
Instructions: Stand tall, facing a step or cone. Beginners should use support from a counter or handrail until balance improves.
In a controlled motion, lift one foot, tap the cone or step for one second, then return to your starting position. As you repeat this motion, you should focus on consistency and control with each tap.
Perform 10 repetitions on each leg. Repeat 2 to 3 times.
Why this is important: This exercise helps improve coordination for ascending and descending stairs. After strengthening your coordination with this exercise, you won’t catch yourself tripping on a step anymore.
Keep Reading to see the 12 Balance Exercises for Seniors
Want the FULL Balance Guide?
Download my entire balance guide with over 40 exercises created by a Physical Therapist:
21 Days to Better Balance
3. Narrow Stance Reaches
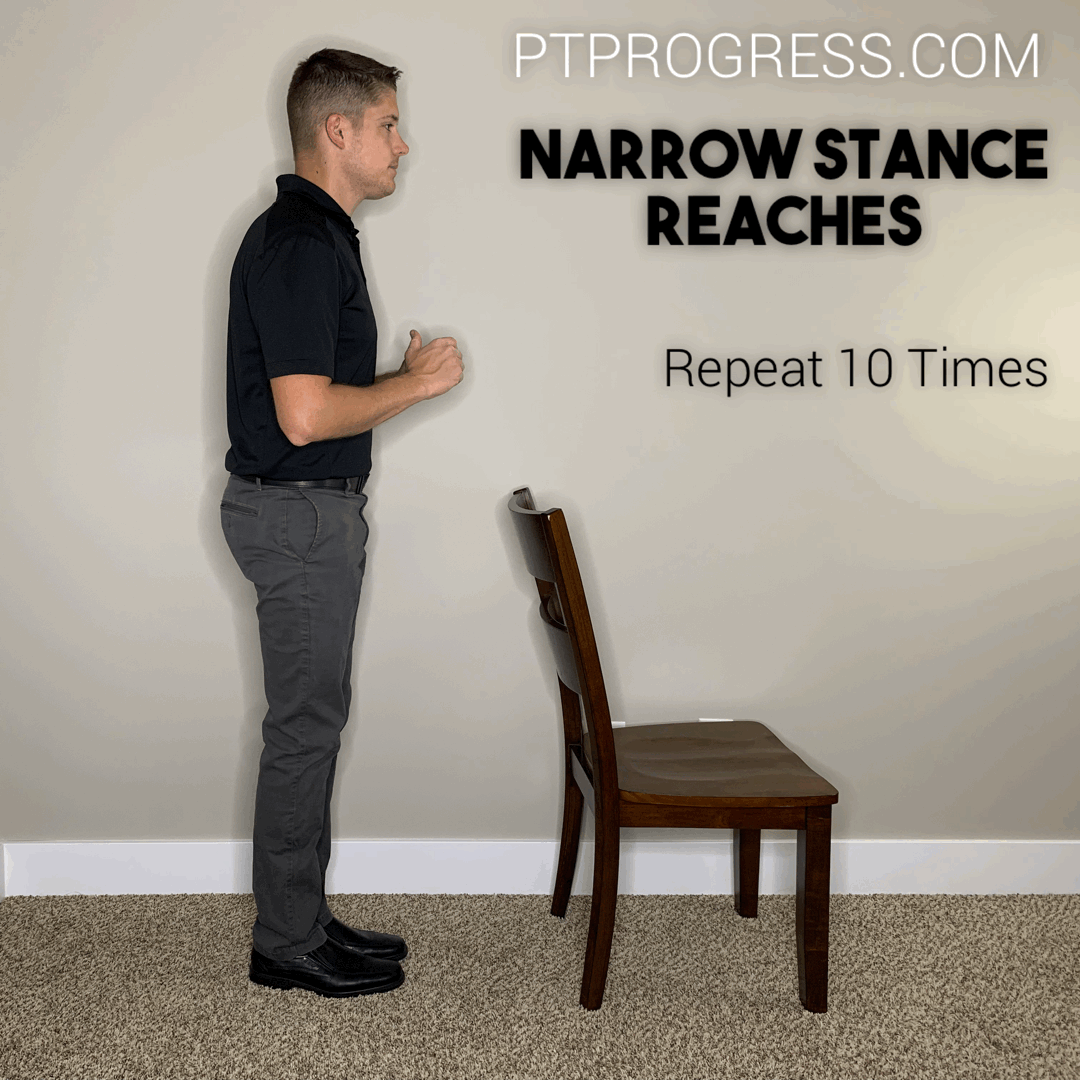
Instructions: Begin with your feet together, or as close together as possible while still feeling stable. Stand tall and reach forward with one hand while holding onto a counter or solid surface for safety.
Alternate arms as you reach forward. Progress by reaching with both hands forwards. You can make this more challenging by reaching out to the side or in varying directions.
Perform 10 reaches with each arm. Repeat 2 to 3 times.
Why this is important: Many falls occur while reaching for an item in a tight space. This exercise strengthens your balance for such scenarios.
4. 3 Way Hip Kick
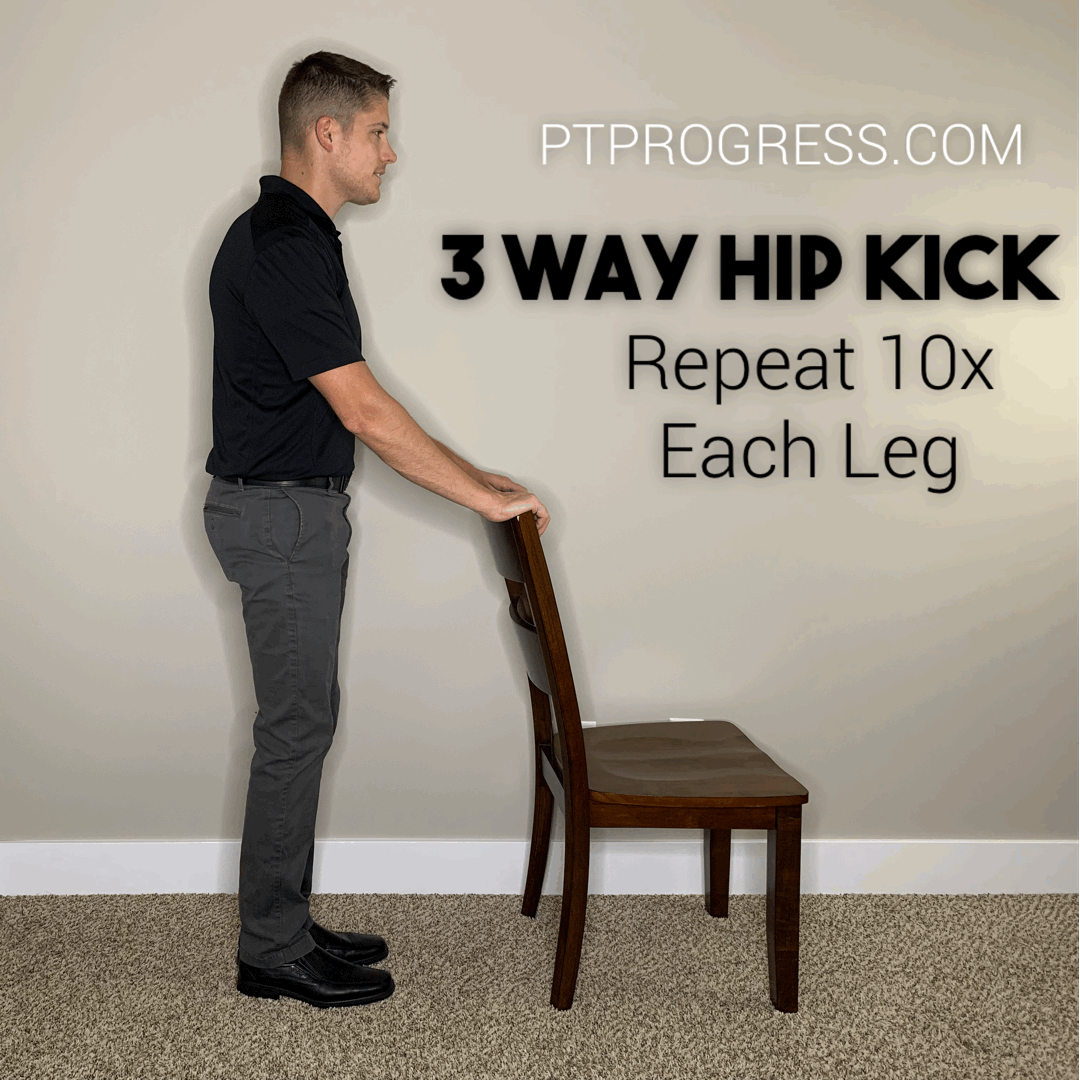
Instructions: Stand with your feet shoulder-width apart. While holding onto a counter or firm surface, extend your leg forward and return to your starting position. Repeat this motion to the side, returning to the starting position each time. Finally, extend your leg back and return to the starting position.
Perform each motion 5 to 10 times on each leg. Repeat 2 to 3 times.
Why this is important: This exercise builds strength in the hip muscles, which help maintain stability with walking, turning, and going up and down steps.
Download my entire balance program with over 40 exercises: 21 Days to Better Balance
5. Standing Marches
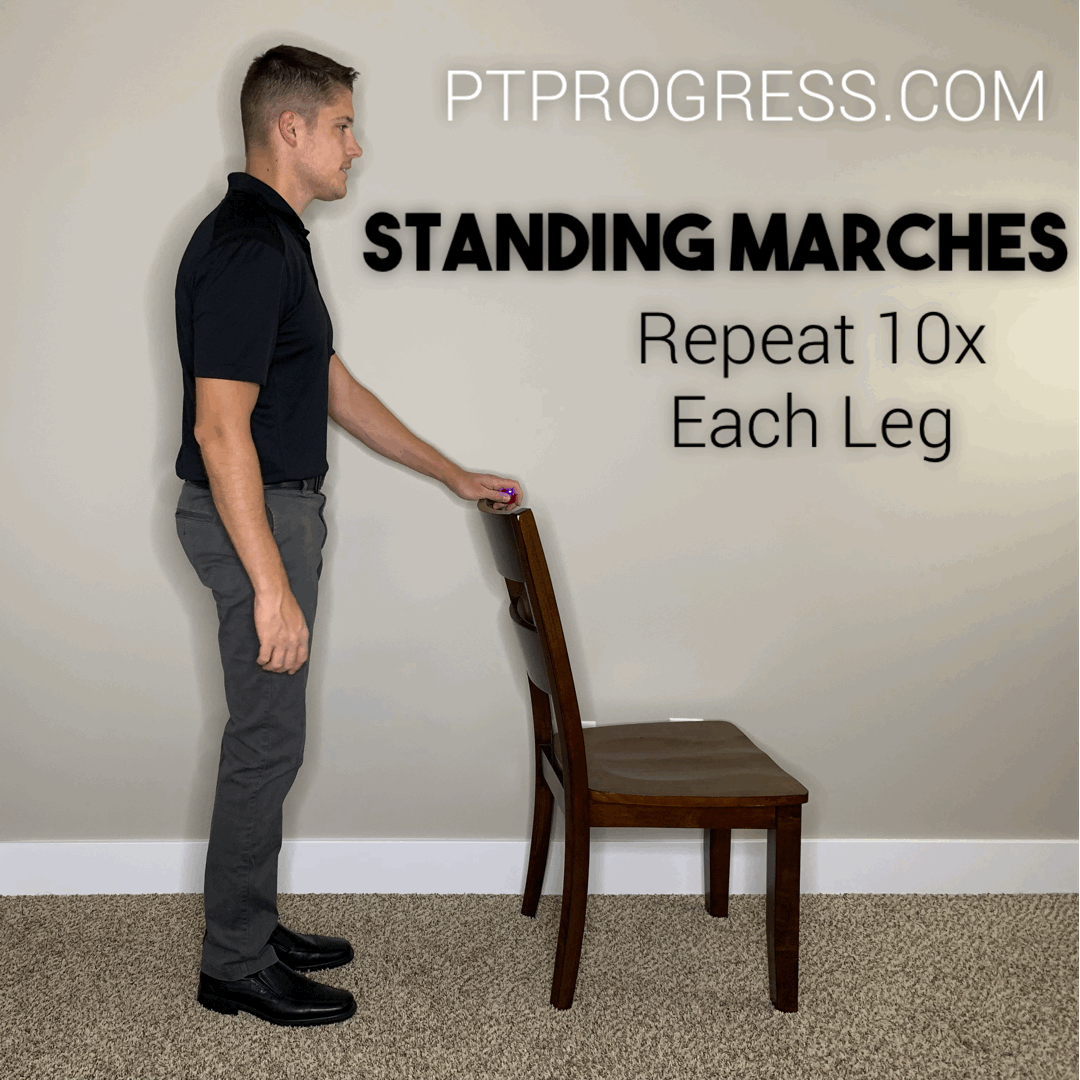
Instructions: Stand with your feet shoulder-width apart. While holding onto a counter or firm surface, raise one leg in a marching motion. Alternate legs. Focus on smooth, controlled movements and keep your body tall to avoid leaning side to side. You can make this exercise more difficult by letting go of the counter or chair.
Perform 20 marches (10 on each leg). Repeat 2 to 3 times.
Why this is important: This exercise is great for improving hip strength and single-leg balance. If your feet ever catch the ground while you’re walking, you’ll benefit from this exercise!
6. Mini Lunges
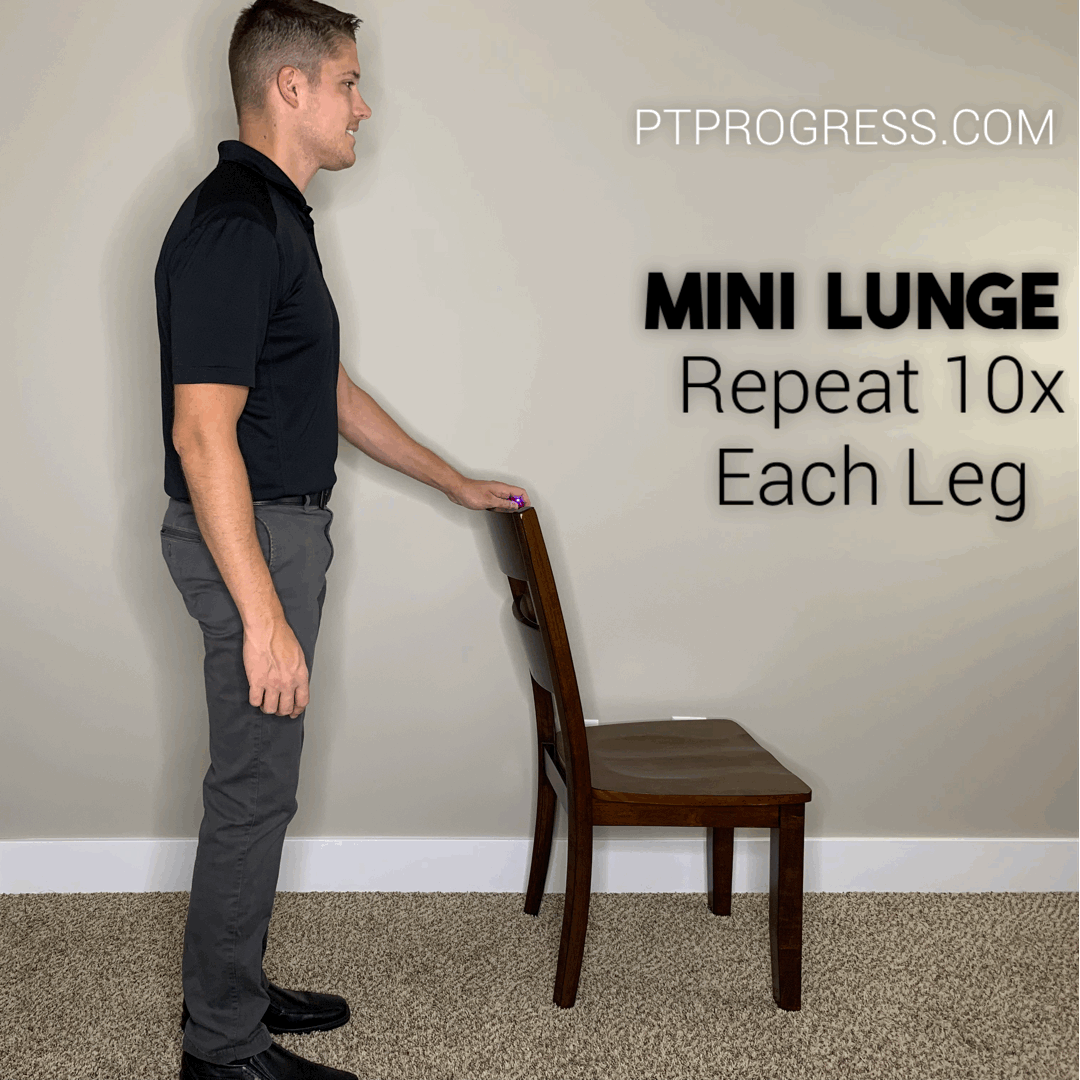
Instructions: Stand with your feet shoulder-width apart. While holding onto a counter or firm surface, step forward and bend your front knee slightly. Return to your starting position and repeat with the opposite leg.
The lunge does not need to be deep. If you experience increased knee or hip pain, modify this exercise by holding onto a counter and taking smaller steps.
Perform 10 mini lunges on each leg. Repeat 2 to 3 times.
Why this is important: This exercise strengthens the legs while simulating a forward stepping motion. If you sometimes stumble forwards, this exercise will help you practice catching yourself before you actually fall!
7. Lateral Stepping
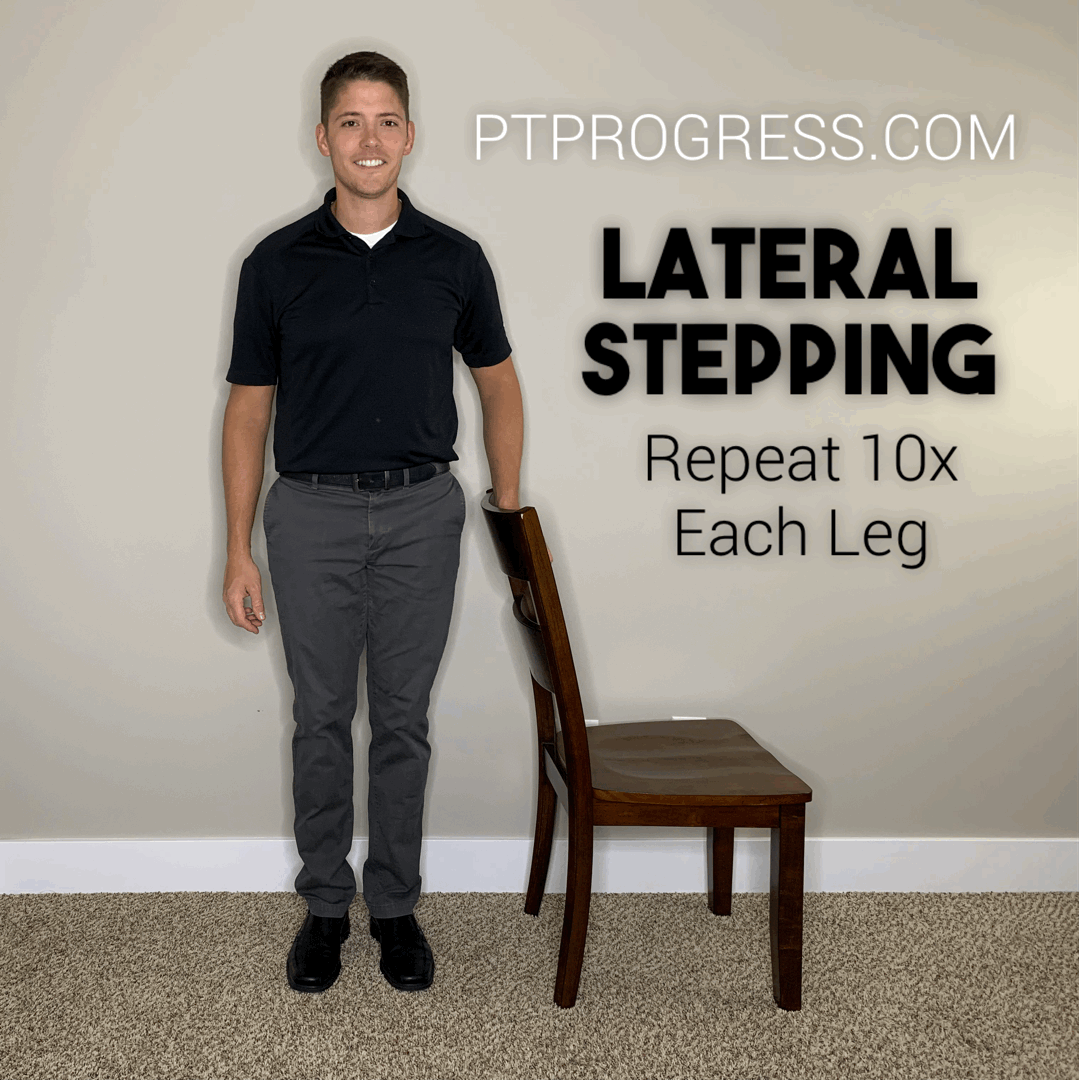
Instructions: Stand with your feet together. While holding onto a counter or firm surface, step to the side so your feet are just past shoulder width. Continue this motion along a counter, performing 5 to 10 steps on each side.
Perform 5 to 10 steps. Repeat 2 to 3 times.
Why this is important: Unfortunately, many older adults fall due to poor coordination when turning and stepping in tight spaces. This exercise helps improve coordination for the many turns and side-steps you take throughout your day.
Download my entire balance program with over 40 exercises: 21 Days to Better Balance
8. Squats
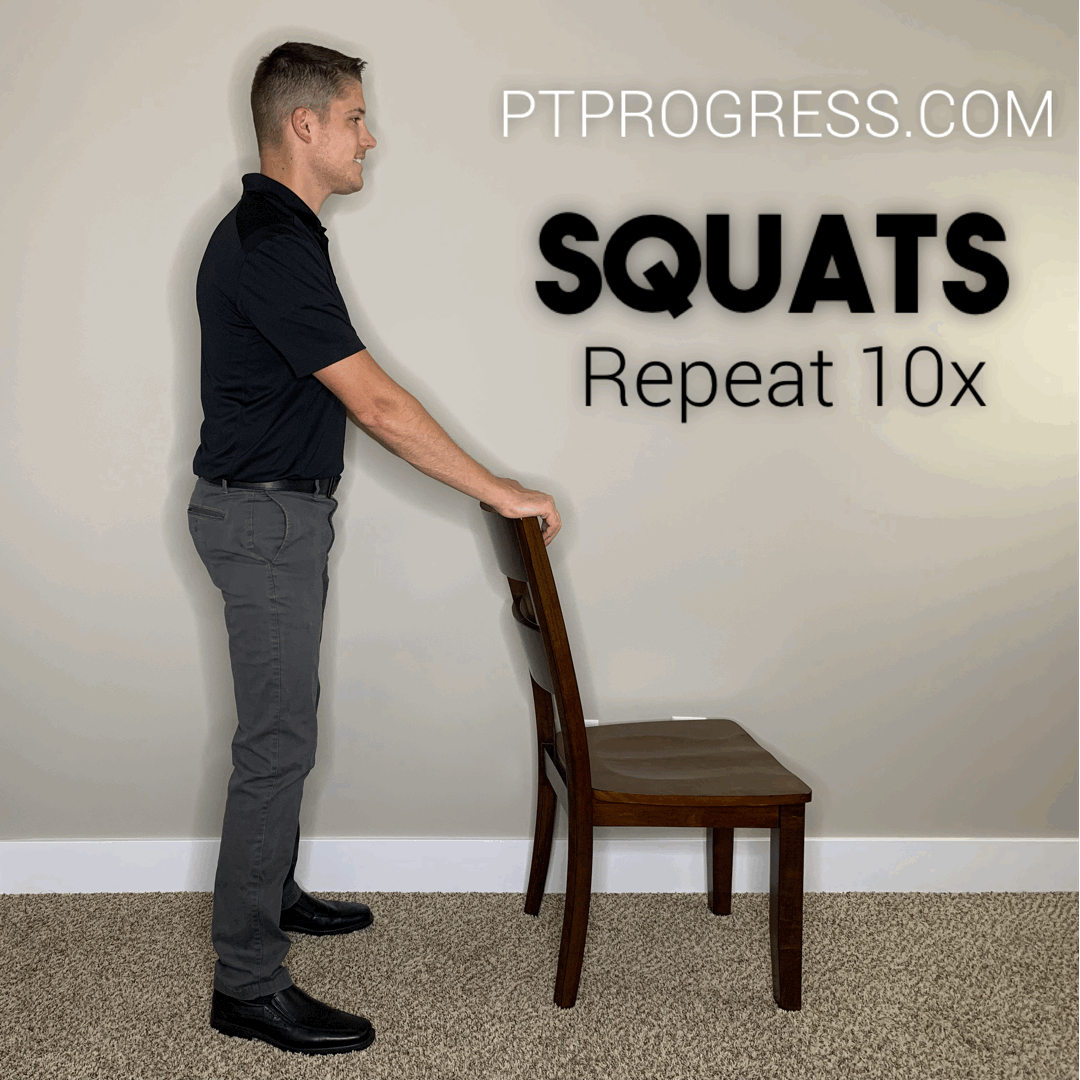
Instructions: Stand with your feet shoulder-width apart. While holding onto a counter, perform a squatting motion, as if you are about to sit down. It can be helpful to position a chair behind you for safety and accuracy.
Perform 10 squats. Repeat 2 to 3 times.
Why this is important: If you’ve ever felt unstable when sitting or standing up from a chair, this exercise will help build strength and coordination!
9. Tandem or Semi-Tandem Stance
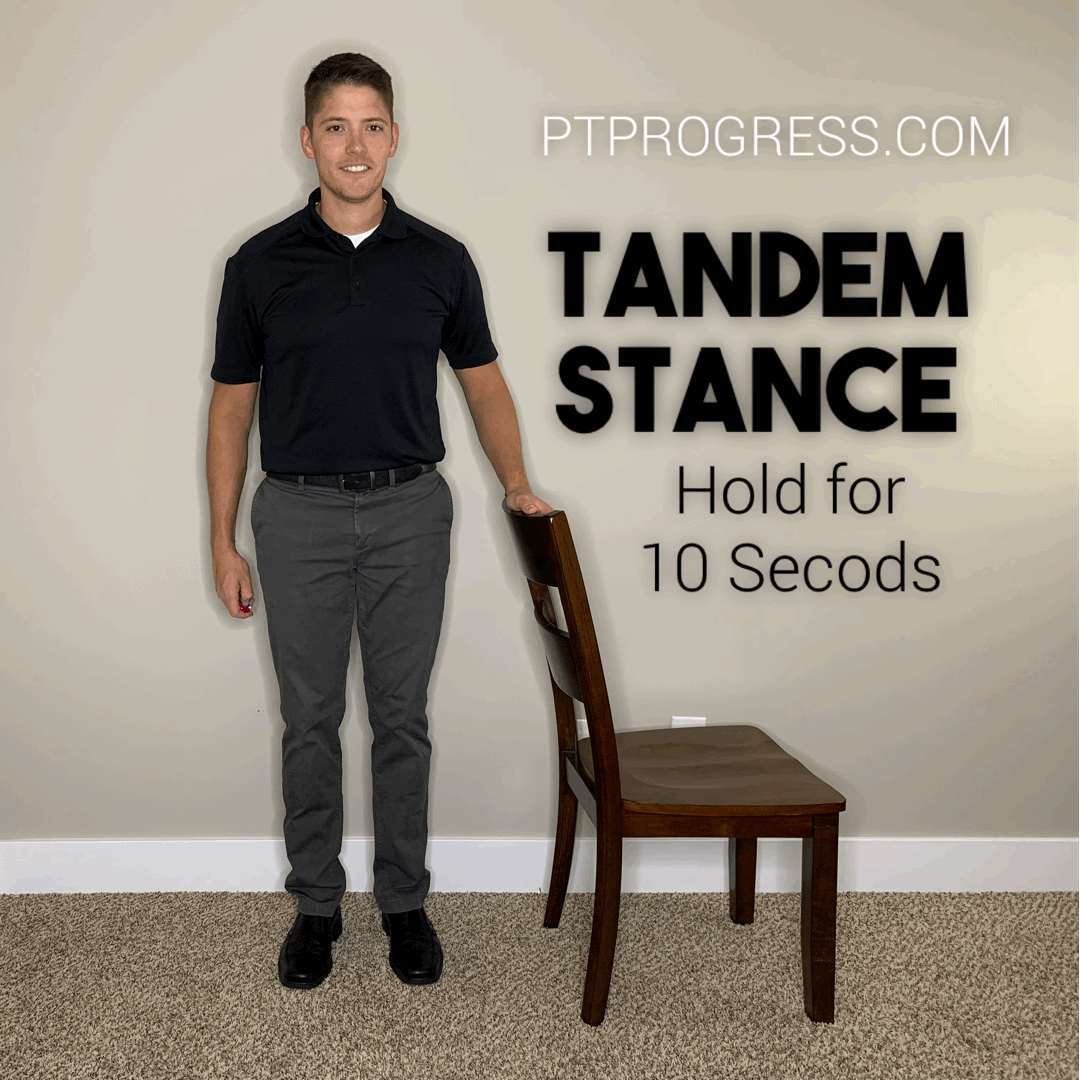
Instructions: Stand with one foot in front of the other so you are in a “heel-toe” position. If this is too difficult initially, move your feet apart slightly. Use a counter or chair for support, as needed.
Hold this position for 10 seconds on each side. Repeat 2 to 3 times.
Why this is important: This exercise is great because it puts your body into a narrow stance. With a decreased base of support, you will challenge your muscles to keep you centered!
10. Heel Raises

Instructions: Stand with your feet shoulder-width apart. While holding onto a counter or firm surface, lift your heels off the ground. You should feel most of your weight shift to the front of your feet, as if you’re standing on your toes.
It’s ok to press into the counter with your hands at first; just make sure you are staying tall and not leaning. Advance this exercise first by reducing how much you press with your arms and eventually by letting go of the counter.
Perform 10 repetitions. Repeat 2 to 3 times.
Why this is important: Your calf muscle contributes to balance because it controls your ankle position. When you feel unsteady or need to correct your balance, you’ll use your ankle muscles to reposition. Stronger calf muscles lead to better balance!
11. Hamstring Stretch (Standing or Sitting)
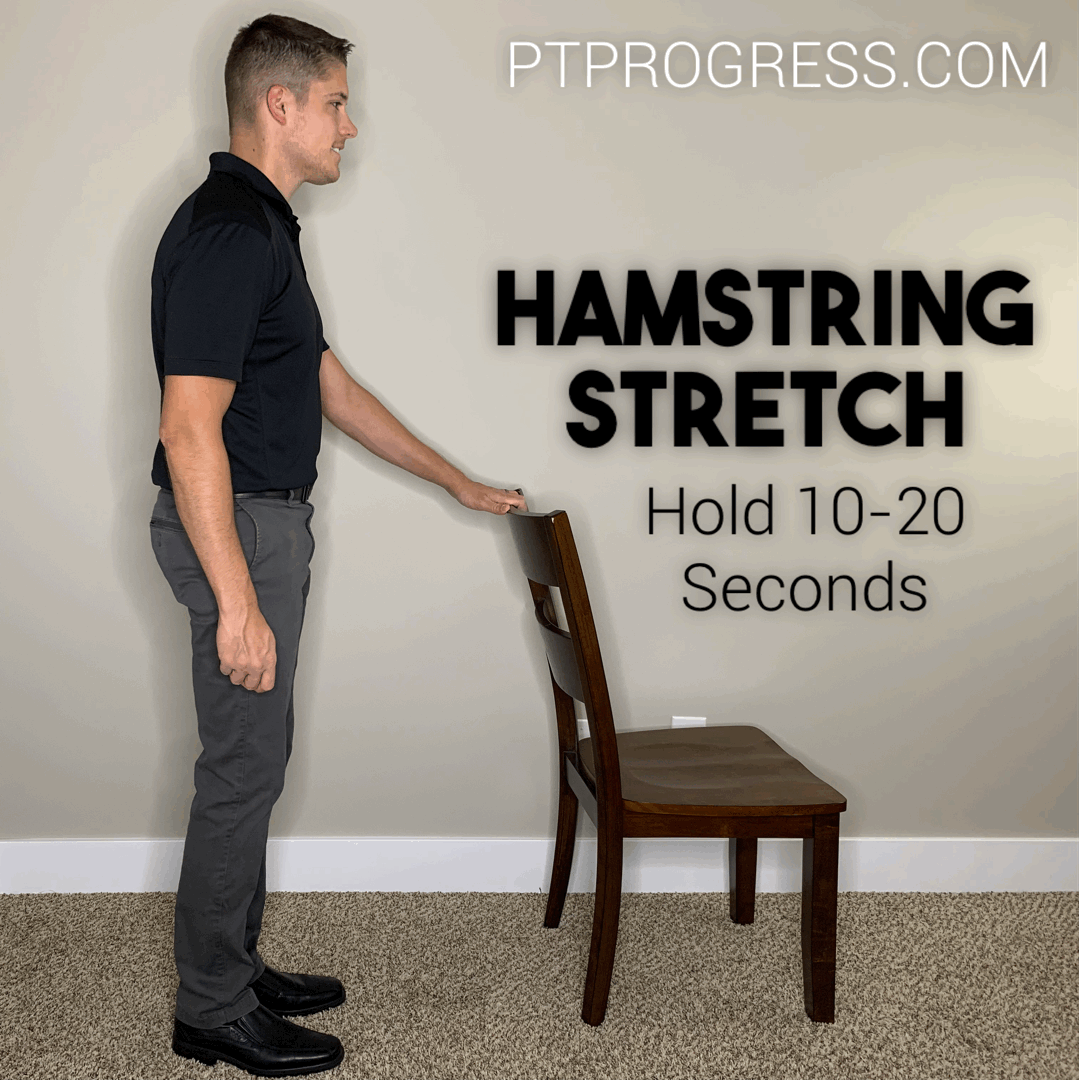
Instructions: Stand with your leg on a step or on the ground slightly in front of your body. Keep your back straight and gently lean forward, feeling a stretch in the back of the thigh and knee.
Another way to stretch the hamstring is to sit and extend your leg, leaning forward until you feel a gentle, pulling sensation.
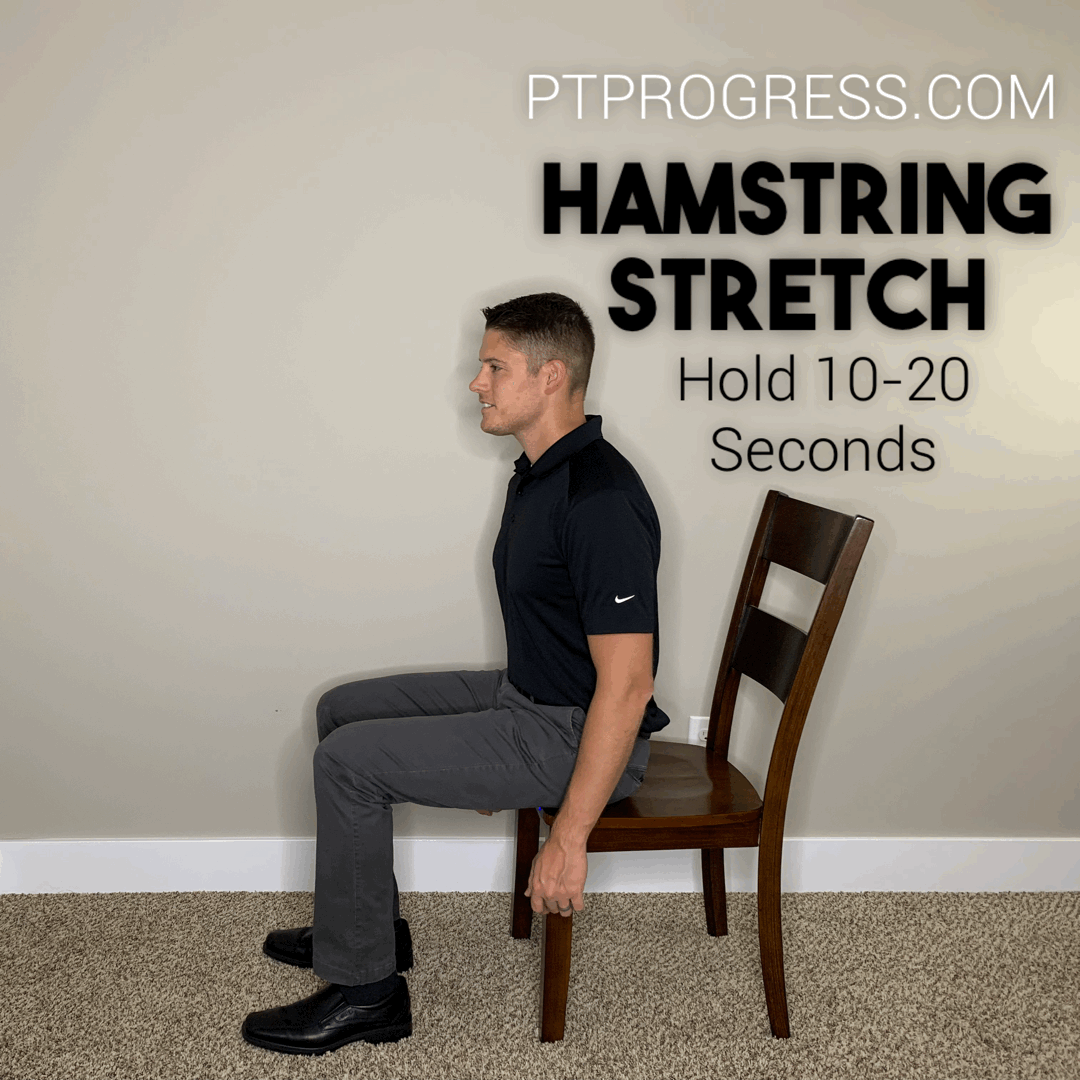
Hold each stretch for 10 to 20 seconds. Repeat 2 to 3 times on both legs.
Why this is important: This is an important exercise for improving balance because the hamstrings can become very tight as we age. This usually happens due to sitting for prolonged periods. Improving hamstring flexibility can help decrease cramping or spasms upon standing up.
12. Calf Stretch
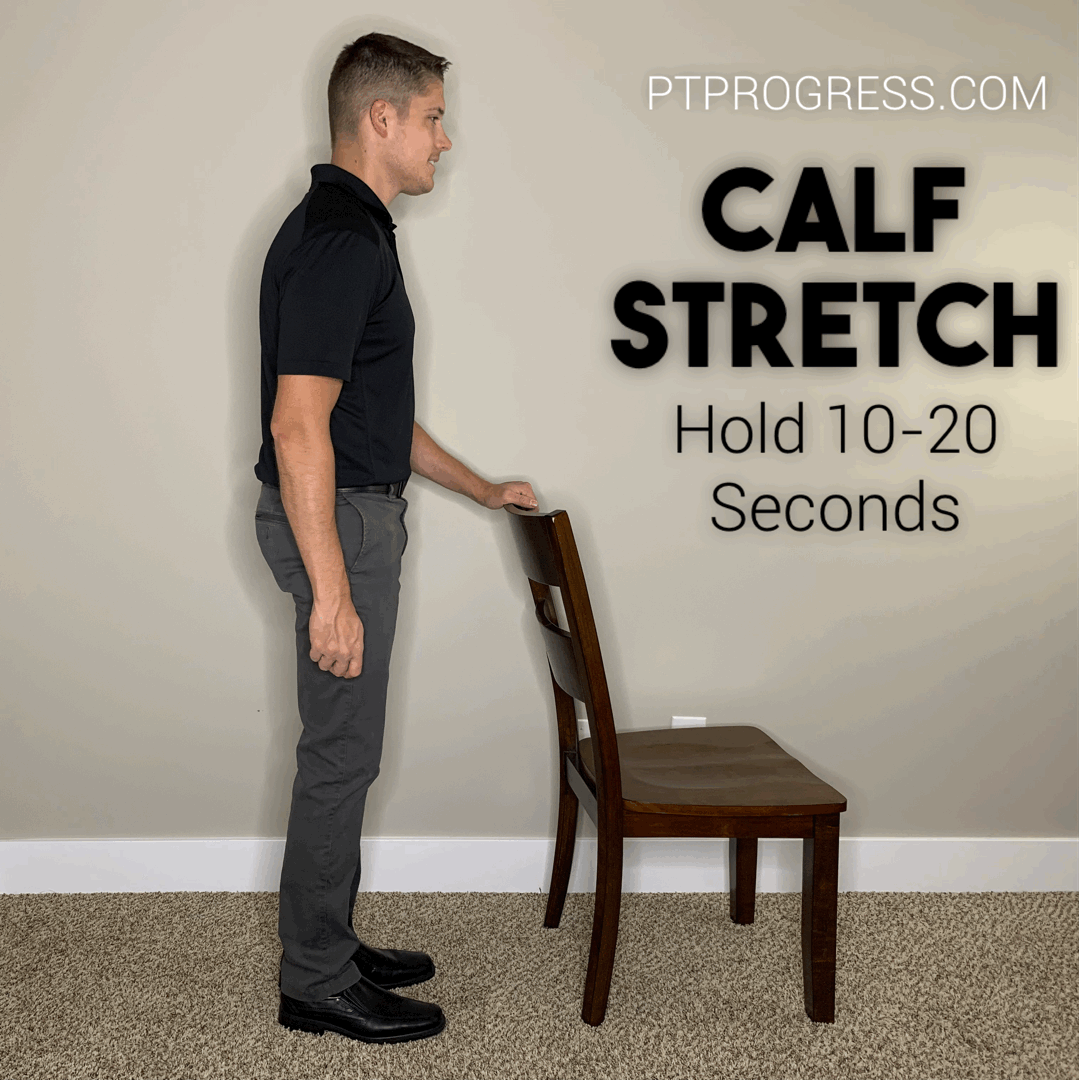
Instructions: Stand with your foot against a step and gently lean forward while holding onto the railing or a countertop. You should feel a gentle pulling in your calf or ankle as you hold for 10 to 20 seconds. Avoid bouncing or rocking back and forth as you stretch.
Hold this stretch for 10 to 20 seconds each leg. Repeat 2 to 3 times.
Why this is important: Stretching the calf can help relieve soreness and cramps in the lower leg. If you’ve ever experienced a charlie horse in your leg that almost knocked you off your feet, this calf stretch will prevent that from happening again!
Download my entire balance program with over 40 exercises: 21 Days to Better Balance
Balance Exercises for Elderly
I work with people who are in their mid to late 80’s and 90’s, and balance is always a priority of my treatment.
There are multiple ways to target balance. When I design balance exercises for elderly patients, I focus on sitting balance, standing balance, and dynamic balance.
Sitting Balance Exercises for Seniors
It’s important to have good balance in a variety of chairs or surfaces, like getting in and out of your bed or on and off the toilet. Oftentimes, standing up from a chair feels unbalanced because of poor sitting balance.
Our next balance PDF handout goes into even more detail on the following essential exercises for seated balance:
- Seated marches
- Alternating arm/leg reaches
- Head turns with minimal support
- Trunk rotation and flexion training
- Sit-to-stand exercises
Standing Balance Exercises for Elderly
The risk of falling is highest within the first few seconds of standing. This is why it’s so important to practice standing balance exercises. Below is a list of some standing balance exercises included in my balance exercise PDF. You’ll recognize a few of them from this article.
- Single-leg stance
- Romberg balance stance
- Tandem / Semi-tandem stance
- Hip kicks (side and back)
- Step-ups
- Sit-to-stand exercises
- Marches
Dynamic Balance Exercises for Elderly
I consider dynamic balance training to be exercise that involves multiple moving parts. This might include standing on a single leg while reaching up or out with an arm. Dynamic balance exercises are so important because they can improve many day-to-day activities such as dressing, bathing, cooking, and cleaning. Here are some more dynamic balance exercises included in my balance exercise PDF:
- Step-up with cone taps
- Reaching from single leg or Romberg stance
- Lateral step up
- Half-forward lunge with arm reaches
- Squat with press up
These balance exercise examples are beneficial for people of all ages. But in my experience as a physical therapist working with older adults, these exercises are especially helpful for the elderly population.
Exercises to Improve Balance
Why Should Senior Citizens Perform Balance Exercises?
Balance exercises reduce the risk of falls in seniors. That’s because balance affects every aspect of daily life, from walking to standing to reaching for shelves in the kitchen. By improving your balance, you’ll improve your confidence and independence.
A Quick Note on Balance Exercise Equipment
Although you can perform most balance exercises without equipment, there are products that, when used correctly, can further help your balance.
Two common pieces of balance exercise equipment I use include the following:
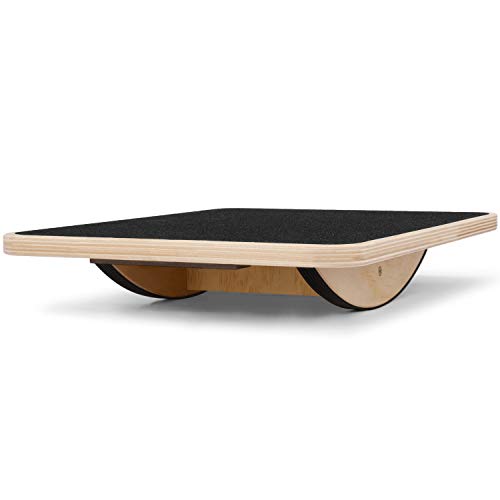
- Balance Board
- Swiss Ball (Stabilization or Stability Ball)
- GREAT FOR BALANCE TRAINING: Improves core strength, posture, enhances coordination, sense of balance and visual sense. Great to strengthen the...
- DURABLE, NON SLIP SURFACE: Premium Wooden Balance Board with anti-skid pad on the surface provides a secure grip for absolute safety. 15.75 inch...
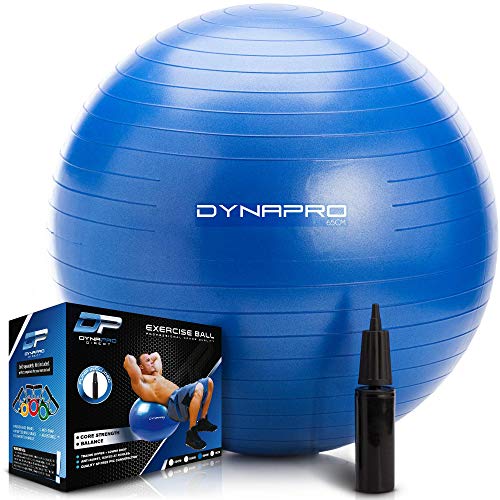
- BUILT TO LAST: Get a quick start on optimizing your health. Every box we ship contains an Exercise Ball that inflates using the hand pump that goes...
- MADE FROM 100% RECYCLED MATERIAL: Our stability balls have a superior anti-burst material with a thickness of 2275 micrometers which delivers a...
Let’s look at a few exercises you can do with each of these items.
Balance Board Exercises
One of the most popular products to improve balance is a balance board. Balance boards are used in therapy clinics to help improve stability and promote flexibility in the calf muscles.
For about $25, you can purchase a balance board on Amazon. Or, make your own balance board if you have the right tools.
Here are a few balance board exercises I do with my patients:
- Front-back rocking
- Side-to-side rocking
- Squats on board
- Single-leg control
- Isometric squat with ball press
- Overhead reaching in squat position
- Medicine ball pass on balance board
Balance Ball Exercises
These exercises can be referred to as “swiss,” “stability,” or “balance” ball exercises. No matter what you call them, stability ball exercises are very effective in improving dynamic balance, core strengthening, and even decreasing aches and pains.
Are you wondering, “What size stability ball is right for me?” In truth, there is a wide range of sizes for balance and stability balls. Measured by diameter, a stability ball ranges from 25 cm for petite users to 75 cm for larger adults.
Use the size chart below for a general guideline when purchasing a stability ball:
Stability Ball Size Chart
| Height | Stability Ball Size |
| Less than 4’ 6’’ or 137 cm | 30 cm |
| 4’ 6’’ to 5’ tall (137 to 152 cm) | 45 cm |
| 5’ to 5’ 6’’ tall (152 to 167 cm) | 55 cm |
| 5’ 6’’ to 6’ 2’’ (167 to 188 cm) | 65 cm |
| Over 6’ 2’’ tall (>188 cm) | 75 cm |
Stability Ball Balance Exercises for Seniors
Here are some of the most common balance exercises I recommend with the stability ball:
- Seated marches
- Arm extensions
- Head turns
- Alternating arm/leg lifts
- Hip rotation
- Modified swiss ball plank
How to Improve Balance
As a Physical Therapist, I’ve helped thousands of older adults improve balance with exercises, stretches, and balance-training programs.
The big question I hear is this: Can my balance improve?
The answer is a resounding “yes!” Your balance can improve whether you’re 45, 65, or 95 years old!
If you’re curious about the balance research that supports this, you can find the references at the bottom of the article. Nothing like science to back up the importance of balance exercises!
Here are the best ways to improve your balance:
Stretching – Improving your flexibility can result in better balance. Stretches can also help improve posture and lead to better stability and balance.
Mobility Training – Joint stiffness can lead to poor mobility, which you’ve probably noticed at times when you get up and down from a chair. Better mobility can lead to improve balance and coordination.
Exercises –- Strengthening the muscles in your legs, core, and arms can lead to significant improvements in your balance. For seniors, I recommend the following 12 balance-improving exercises.
Balance Exercises for Seniors PDF Handout
If you want to improve your balance with a structured plan, download the “21 Days to Better Balance” exercise guide to see what I teach my patients in the clinic. This guide includes daily routines and balance exercises for seniors, with pictures for easy reference.
Is there a Free Balance PDF Handout?
Previously, I provided an option to download a balance PDF handout for all 12 balance exercises pictured in this article. Instead, just bookmark this page and reference it for free!
I’ve since expanded the Balance Exercises for Seniors handout to incorporate the entire balance program I use in my clinical practice.
Frequently Asked Questions
What Exercises Help Improve Balance?
The best balance exercises include single-leg stance, narrow-stance reaches, 3-way hip kicks, standing marches, mini lunges, lateral stepping, tandem or semi-tandem stance, and heel raises. All of these exercises target important muscles that need to be strong in order to improve your balance.
How can I regain my balance?
You need to start balance exercises and practice them for a few weeks. It will take time to see improvements – maybe even a couple of weeks – but it’s important to be consistent with your training. I assure you, your persistence will pay off; exercises, stretches, and stability training are proven ways to regain balance.
Does walking improve balance?
Walking can improve balance, but why not take this healthy habit a step further by including a few simple balance exercises? Many people feel unbalanced while walking, so it’s important to practice basic balance exercises to improve stability.
Why does balance get worse with age?
As you age, the number of nerve cells in your vestibular system decreases. Simultaneously, vision worsens, which can significantly affect balance. Your awareness of your body’s position in space is called proprioception, which also worsens with age and slows your response to changes in position. Each of these figures contributes to poor balance and a higher risk of falling.
How can seniors improve balance?
Seniors can improve balance by starting a simple routine of exercises and movements that strengthen and improve coordination and stability. Many studies show improved balance after 6 to 12 weeks of balance training.
At what age does balance decline?
There is no magical age, but in general, balance declines around age 55 to 65. Anatomical studies show that the number of nerve cells in the vestibular system starts to decrease at age 55. The good news is that with balance exercises, you can significantly improve strength and stability.
What causes balance problems in older adults?
Multiple factors such as poor vision, decreased strength and endurance, uncontrolled blood pressure (orthostatic hypotension), and decreased nerve cells in the vestibular system can all contribute to balance problems in older adults.
References:
- CDC Report on Falls
- Community-based group exercise improves balance and reduces falls in at-risk older people: a randomised controlled trial
- A balance exercise program appears to improve function for patients with total knee arthroplasty: a randomized clinical trial.
- Training of balance under single- and dual-task conditions in older adults with balance impairment.
- The effect of multidimensional exercises on balance, mobility, and fall risk in community-dwelling older adults.
- Effects of elastic-band resistance exercise on balance, mobility and gait function, flexibility and fall efficacy in elderly people.
- Effect of Lower Extremity Stretching Exercises on Balance in Geriatric Population.
- A best practice fall prevention exercise program to improve balance, strength / power, and psychosocial health in older adults: study protocol for a randomized controlled trial