Lateral ankle sprain (LAS) is one of the most common injuries in sports, but it can affect people of all ages and fitness levels. Below I provide an overview of this everyday injury as well as some of the best tips for treating a sprained ankle, according to the latest medical research and my own experience as a physical therapist.
What is a Sprained Ankle?
Spraining your ankle means injuring one or more of the ligaments that stabilize your foot, either by tearing those ligaments or stretching them so they undergo microscopic tearing. You might hear a “popping” sound or otherwise feel sharp pain as your ankle rolls or “gives out.”
Ankle sprains are widespread in sports because they often occur during high-impact running, jumping, and cutting motions such as in basketball or tennis. But walking on uneven surfaces, tripping on an obstacle, or landing a bad fall can also sprain your ankle.
Most of the time, an ankle sprain occurs when the foot rolls sharply in inversion, so that the top of the foot rolls outward while the heel rolls inward. The opposite type of ankle sprain, eversion, does occur but makes up less than 10% of cases.
Whichever direction you roll your ankle, you’ll likely experience pain, bruising and swelling. Your ankle may feel unstable for weeks afterwards, and you may develop chronic ankle issues, including reinjury, as a result of the initial sprain. To rule out a broken bone or other injuries, it’s best to have a doctor properly evaluate—and grade—your sprain.
Ankle Sprain Grades
How severely you sprained your ankle will determine how the sprain is “graded.” In a grade 1 sprain, the ligaments suffer only microtears and stretching; you’ll have some tenderness and swelling but little pain walking on that ankle.
A Grade 2 sprain indicates partial tears to the ligaments in your ankle. You might feel unstable on that foot and be unable to walk without pain. Completely tearing the ligament warrants Grade 3 classification, a significantly more painful condition. If you can’t walk on your ankle and have considerable pain and swelling, it might be grade 3.
How Long Does a Sprained Ankle Take to Heal?
Most sprains in grades 1 and 2 heal within 4–6 weeks, and sometimes sooner. Depending on your level of activity, it may take only a couple weeks for you to fully return to a sedentary lifestyle, and a few more weeks to revive an active one.
Severe grade 3 sprains, however, may take several months to recover. The extensive trauma to the ankle naturally requires more rest, more careful movement, and a longer recovery period. If, 4–6 weeks into your recovery, your symptoms do not improve, you may need to consult with an orthopedic surgeon to discuss reconstructive surgery to repair the tear.
But don’t think that just because you have a complete tear or a grade 3 sprain that surgery is inevitable. Many times, patients are able to fully heal from a complete tear without undergoing surgery. It all depends on their rehabilitation!
Avoiding Chronic Ankle Instability
Besides helping you sidestep surgery, rehabilitation can help prevent a recurrent ankle sprain. Wobbly ankles and repeat sprains may indicate chronic ankle instability, a condition that not only results from repeated ankle sprains but also precipitates them. Around 40% of ankle sprain patients continue to have symptoms of chronic ankle instability after their initial ankle sprain.
Why is chronic ankle instability (CAI) so common? Many factors can predispose someone to this condition, including BMI, age, height, and sports activity. But a history of ankle sprains is one of the strongest indicators of CAI. That’s why it’s so important to prioritize ankle sprain rehabilitation; do it right the first time, and you’ll be less likely to have to do it again.
Tips for Treating a Sprained Ankle
So what’s the best way to rehabilitate a sprained ankle? Lucky for us, there’s a lot of research behind this question; that’s one benefit of the ubiquity of lateral ankle sprains.
According to this report by the JOSPT, therapeutic exercise is among the top recommendations for treating an ankle sprain. As a physical therapist, I can’t help but heartily agree. In the clinic we use a wide variety of therapeutic treatments to rehabilitate the ankle, from balance training and postural re-education to neuromuscular training and strengthening exercises. And you don’t have to take my word for it; research shows that therapeutic exercise can significantly reduce a recurrent sprain.
Other interventions supported by research include the following:
- Bracing the Ankle: for more severe sprains in grades 2 and 3, your doctor may recommend you wear an ankle brace to stabilize the joint and help prevent further injury.
- Taking NSAIDs: non-steroidal anti-inflammatory drugs such as ibuprofen, acetaminophen, and piroxicam, which can reduce pain and swelling.
- Following the POLICE method: The old “RICE” method got a makeover, and current recommendations reflect a more comprehensive approach. I unpack this new acronym below.
The POLICE Method for Treating an Ankle Sprain
The POLICE method stands for protection, optimal loading, ice, compression, and elevation. Compared to the old RICE acronym, POLICE swaps “rest” for “protection” and “optimal loading.” Resting plays a part in rehabilitation, but after the first day or two, your body will need motion and activity to retain and build strength.
So let’s look at each of these elements one by one:
Protection
For an ankle sprain, protecting the injury involves not only a physical barrier but a stabilizing support as well. An ankle brace, mentioned above, can offer ample protection to a moderate-to-severe injury. But for minor sprains, consider using an ankle wrap, which will allow for some range of motion.
To wrap your ankle, sit on the edge of your bed with the bottom 12 inches of your leg and foot exposed. Using the entirety of a roll of ankle wrap, begin wrapping your ankle around the arch of your foot. Keep your foot in “neutral,” at a right angle with your leg.
As you come up and around the foot, pull the wrap so it’s 50% stretched—not stretched all the way, but not at all slack. After a couple overlapping layers, begin wrapping in a figure 8 around the base of your ankle, ending with a few overlapping layers around the upper part of your ankle. The wrap should become a little less snug as you work your way up. Secure the wrap with pins, tape, or velcro if included.
If you’ve wrapped the ankle properly, the wrap will feel snug around the foot but not tight enough to cut off circulation or cause numbness or tingling in your toes. You can keep your ankle wrapped all day, including while wearing shoes.
For more tips on wrapping your ankle, including a demo from Bob & Brad, check out this video:
Optimal Loading
The “O” and the “L” in our POLICE acronym work together to remind you to use your injured ankle, but only what’s optimal for it. In the first few days you may not be able to “load” your ankle with much weight at all, but some stretches and range of motion exercises will help keep it strong.
Watch that you don’t fall into one of two camps. In camp one, the patient babies their injury and stays sedentary for weeks, during which time the stabilizing muscles in the foot weaken. Although the pain and swelling have gone away, their foot is worse off for its couch-potato vacation, and the patient might be more likely to roll their ankle again later.
In the other camp, the patient tries to do too much too soon. Instead of limiting their exercise to light therapy and stretching, they try to run errands and go about a normal day. Such activity can strain the sprain and make it worse. Optimal loading helps you land somewhere in the middle, using appropriate rest, optimal challenge, and a gradual introduction of weight-bearing exercise that will help the ankle handle the loads it used to bear.
Before I share some physical therapy stretches and exercises for a sprained ankle, I’ll just touch on the last three components of the POLICE method: ice, compression, and elevation.
Ice
The shock of cold temperature to a red-hot injury will constrict your blood vessels and stymie swelling while numbing the pain of the sprain. Apply ice to your ankle for 20 minutes at a time, taking care to protect your skin by wrapping the ice pack in a towel.
For the support of a wrap and the therapeutic benefits of an ice pack, look for an ankle ice wrap. I recommend a few brands in this article.
If you’re in a pinch, you can make an ice pack yourself at home using a couple zip-top bags, water and rubbing alcohol. Fill one bag with 2 parts water and 1 part rubbing alcohol, then seal and stuff it inside the other bag. Seal and freeze for 1 hour. The alcohol will help keep the ice cold but malleable so it can form around your ankle.
Compression
Compression helps reduce swelling by constricting fluid away from the injury, where it naturally wants to pool. A compression wrap can help do this while also providing light support to the ankle.
If you’re already wearing an ankle wrap or brace, chances are you already have compression covered. Just make sure it’s applied snug enough to provide compression benefits without being uncomfortably tight.
Elevation
Finally, while you’re icing your ankle or just resting at home, make a special effort to keep your foot elevated to the level of your heart. That will encourage any pooling fluid to return back towards your heart. Try to spend at least 2 to 3 hours each day with your foot elevated.
But remember, you shouldn’t only be on your couch while you recover from your ankle sprain. Be sure to practice optimal loading with the following exercises.
Physical Therapy Exercises for a Sprained Ankle
Although your primary focus is on rehabilitating your sprained ankle, it’s smart to perform these exercises on both ankles. Chances are your uninjured foot is equally prone to injury and can benefit just as much from some additional therapy.
Ankle Pumps

For this one you don’t even have to get up off the couch. Sit with your legs straight out in front of you with a pillow or rolled-up towel under your calves. Now point your toes in what we call plantar flexion. Release them backward in dorsiflexion to do one “pump.” Continue pumping your ankles, like you’re pumping a brake pedal, 10–20 times for one set. After a couple weeks, work up to 3 sets of these.
Ankle Alphabet
While seated with the towel under your calves, spell out the alphabet with your toes, starting with your injured foot. Each letter will require a unique combination of flexion, dorsiflexion, and rotational movement in your ankle, all important motions to reintroduce without any weight at this point in your rehabilitation.
Resisted Eversion and Inversion
For these two exercises, you’ll need a resistance band—something light to start out with. If you have looped resistance bands, they’ll work perfectly; but you can also tie a knot in a flat band to make a loop. Sit on the floor and extend the leg with the ankle sprain out in front of you as straight as you can. You’ll use the band to practice two motions with your foot: eversion and inversion. For eversion, you’ll flex your foot away from the midline, while in inversion you’ll point the foot towards the midline.
To practice eversion, loop the resistance band around the wide part of your foot, just below the toes, and anchor the other end behind a closed door or other sturdy point that’s perpendicular to your foot. Start with the band slightly taut and your foot pointed inward, then stretch the band by flexing the toes and turning the foot outward. This might begin as a very small movement, and that’s okay. What’s important is that you stay within a pain-free range. Repeat 10 times before switching directions.
For inversion, you’ll need to reposition the band and anchor it on your other side. Wrap the band around the same wide part of your foot while it’s flexed outwards. Then point your toes inward and turn your ankle towards the midline to stretch the band. Repeat 10 times for one set.
Weight Shifting
This simple balance exercise is a precursor to the single-leg stance, or standing on one leg. While your ankle is still recovering, it may feel too painful to put all your weight on that ankle. But it’s important that you practice loading it optimally, to the point it can handle. So weight shifting allows you to scale the amount of weight you place onto the ankle, eventually building up to a full weight shift.
Stand shoulder-width apart near a counter or a sturdy chair that you can hold for support if needed. Next, sway slightly so your weight shifts from side to side, being careful to stay within a pain-free range for your ankle. Gradually increase the amount of weight you shift onto that injured ankle until you can put 100% of your weight on that foot. This may take a week or more, so progress gradually.
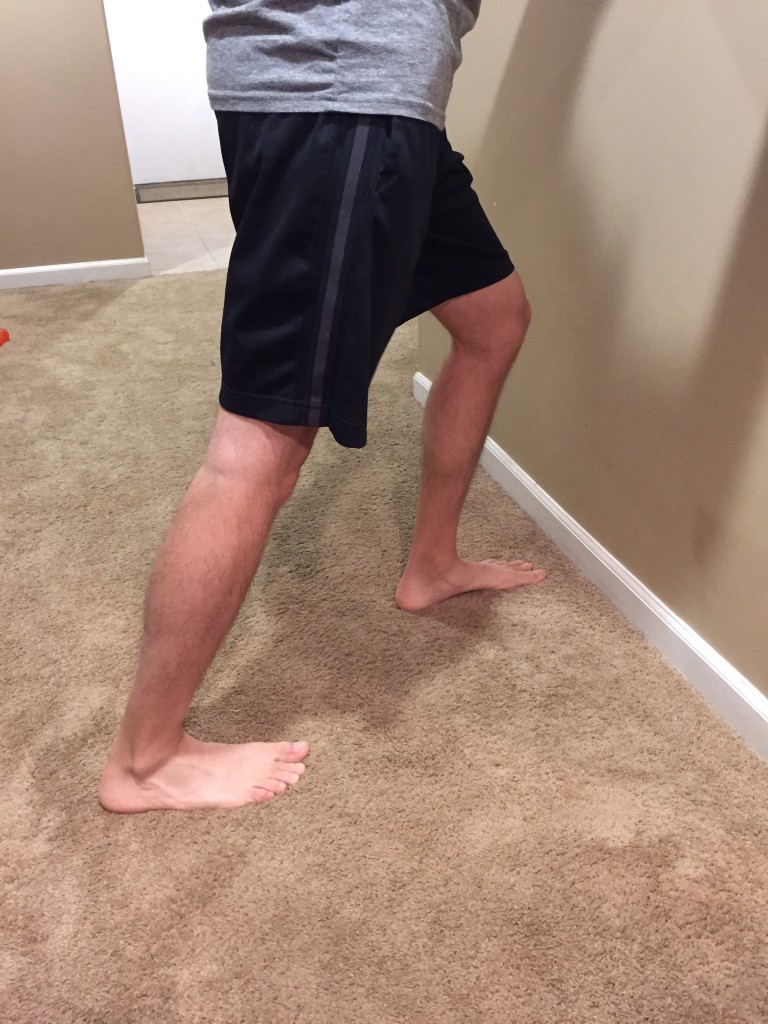
Mini Lunge
If you’re athletically minded, chances are you’ve already performed hundreds of lunges in your workouts. This popular pose incorporates balance, coordination, and strength in multiple muscle groups.
But for now, practice a Mini Lunge. Stand up tall, then step one foot forward so it’s about 18 inches in front of the other. As you lunge, bend both knees and shift your weight forward onto your front leg and the ball of your back foot. Your front knee should not bend past your toes. Hold at the bottom for a second or two, then slowly return to the start position with your feet together. Perform 10 reps on each side and then switch legs. As you get stronger and more stable, work up to 3 sets of Mini Lunges.
Calf Stretch
As you rehabilitate your ankle, don’t overlook the nearby muscle groups, such as your calves and hips, that can help support a stronger, healthier ankle. Too-tight calf muscles can make it harder for your foot to flex in ankle dorsiflexion, and your ankle may be more likely to pivot or roll as a result.
To stretch your calves, stand in front of a wall with your hands on the wall. Step one foot back behind you, then sink the leg down so that the heel reaches the floor. You should feel a stretch in your calves; if not, step the foot out further back from the wall. Hold for 20–30 seconds, then switch legs and repeat 3 times each.
For a different kind of calf stretch, stand on the bottom step of your stairs, holding onto the railing for support. Inch your feet backwards so your heels hover over the edge of the step, then relax your weight into your heels. Once you feel a stretch in your calves, hold for 20–30 seconds, repeating 3 times.
Hip Abduction
Strengthening the hip muscles can help support the joints above the ankle. And that’s important when your ankle is prone to instability, like it is after a sprain. Weak hip muscles can cause you to turn your leg inward, making you more likely to strain or even sprain your ankle.
It sounds fancy, but hip abduction exercises are extremely simple to perform. Stand tall, with a chair or wall in front of you to help you keep your balance. Keeping your foot flexed and pointing straight ahead, raise one leg to the side a few inches; hold at the top for a second or two, then slowly return your foot to the floor. Make sure you don’t lean forward or backward as you do this; your moving leg should stay in the same plane as your standing leg. Repeat 10 times before starting over on the other side.
You can also perform hip abduction while lying on your side. Find an exercise mat or padded carpet, and lie down on one side keeping your spine straight, and your hips, legs, and feet stacked on top of each other. You can lay your head down on your lower arm to cushion it. Next, flex your top foot and raise the top leg a few inches before returning to the start position. Repeat 10 times, being careful not to rotate in your hips.
To advance a hip abduction exercise, increase the distance your leg travels or loop a mini resistance band around your thighs, just above your knees. Work up to 3 sets of 10 reps.
Summary
A lateral ankle sprain may be a common injury, but it’s not a quick fix. To fully heal for the long-term, your ankle will need more than an ice pack and some OTC painkillers. Therapeutic exercise like the ones described in this post can help rebuild ligaments, improve balance, and strengthen proximal muscle groups so that your ankle is better supported in the future.